1

Adventures in Groovy – Part 39: First Common Parent

I can’t tell you how many times I have been at a client and they wanted to replicate eliminations at the first common parent like HFM, or some other consolidations system.  Maybe there is a good way to do this, but I could never find an efficient and effective way to accomplish it with Essbase calculations.  Well, that is history.  This is yet another example of how to solve an historically complex problem very simply.

What Is The First Common Parent

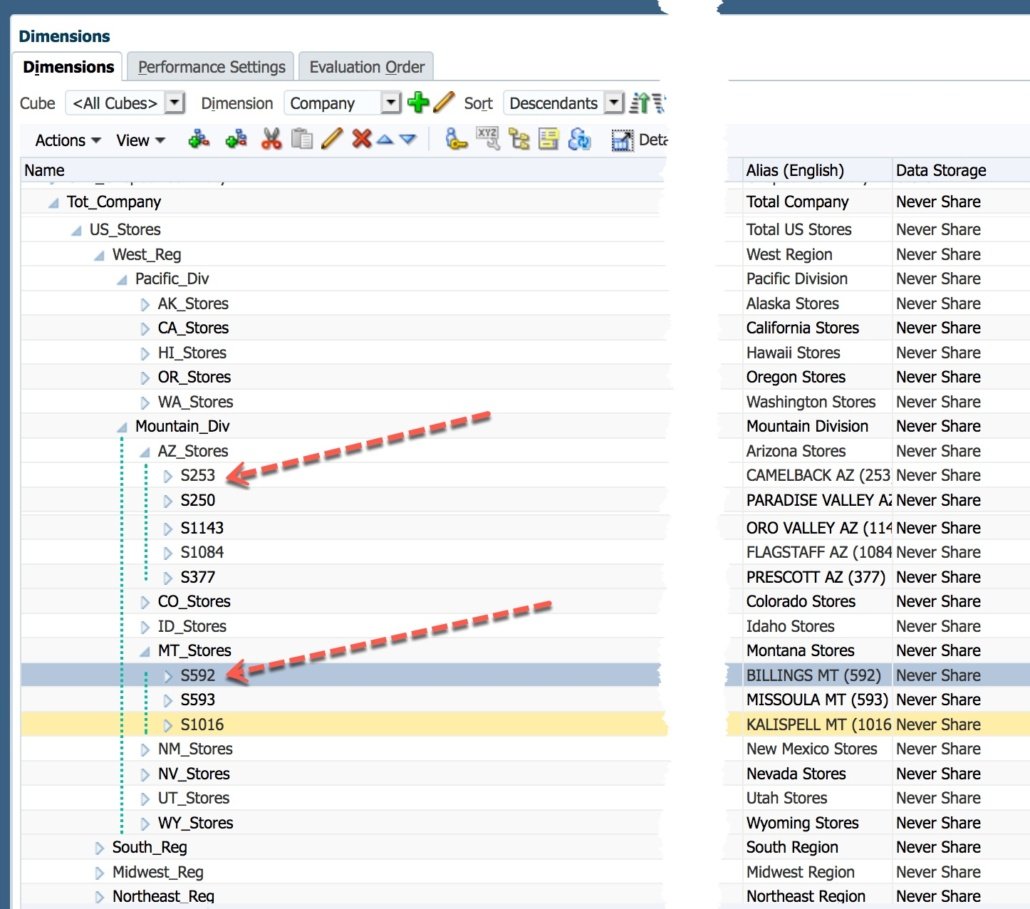
Eliminations functionality addresses the posting of inter-company eliminations in scenarios where a full legal consolidation model is not required, such as within a standard financial model.  An example would be eliminating sales to another entity inside the organization so the total sales of the organization is not inflating the real sales of the organization.  This is typically done at the first node that consolidates the two entities, or first common parent.  In the example below, which will be used in the code below, we need to find the first common parent to do the eliminations for entity S253 and S592.  The hierarchy below shows that the first parent of these two members is Mountain Division.  This is the entity that will calculate and hold the eliminated sales.

Surprisingly Easy With Groovy

The Groovy classes available to us have the ability to query metadata.  This allows a calculation to return all kind of things, like the ancestors of members.  Groovy takes over the rest by comparing the arrays returned.

For this example, the calculation prompts for two members.  In an real-world example, these would likely be defined in the calculation, or maybe with UDAs or attributes.  The prompts in this example, C1 and C2, are run time prompts connected to the hierarchy above.  Once the members are defined, the next step is to query the ancestors of each of the two members.

First, a connection to the application that has the dimension and members is defined.  Once that is done, a dimension object is created that is used to execute the queries.  Since we need ancestors, we use IAncestors.

/*RTPS:{C1} {C2}*/
Cube cube = operation.application.getCube("Fin")
Dimension companyDim = operation.application.getDimension("Company")
List companyOne = companyDim.getEvaluatedMembers("IAncestors(${rtps.C1.toString()})", cube) 
List companyTwo = companyDim.getEvaluatedMembers("IAncestors(${rtps.C2.toString()})", cube)

companyOne returns an array with the following values.

[S253, AZ_Stores, Mountain_Div, West_Reg, US_Stores, Tot_Company]

companyTwo returns an array with these values.

[S592, MT_Stores, Mountain_Div, West_Reg, US_Stores, Tot_Company]

The hard part, if you consider that hard, is over.  Now that the two arrays are defined, a snazzy Groovy method are used.  The intersect method will return the common elements of two lists.

The order of the elements returned by the PBCS classes is ordered from the bottom of the hierarchy to the top.  The first element would be the first common parent!  This example doesn’t illustrate it but this would work for staggered hierarchies just the same.

List commonParents = companyOne.intersect(companyTwo)
println "First common parent for ${rtps.C1.toString()} and ${rtps.C2.toString()} is ${commonParents[0]}"

The println results in the following message to the job console.

First common parent for "S253" and "S592" is Mountain_Div

That is it boys and girls.  In 6 lines of scripting (and it could be less as some variables are introduced to clearly articulate the process and methods), the first common parent is identified.  The most difficult part would be the business logic to accomplish the actual business requirement.

All Done

Now that you know how to get the first common parent, this can be used to dynamically create the appropriate Essbase calculations to provide all the functionality that is needed.  If you like this, share it with the community.  Post comments if you have any questions.  I love getting feedback.


Adventures in Groovy – Part 38: Challenge Accepted (Exporting Data With The System Date In The Filename)

I had a great question today so challenge accepted!  A reader asked if it was possible to run a data export and have the system date in the file name.  The answer is very simply, yes.  I don’t have any content around the question, so I will answer it in two ways.

Option One – Groovy

If you have read any of the pieces of this series, you know how excited I am about Groovy.  Yeah, I know, Groovy can do everything.  You are tired of hearing me say that.  I know it can’t do everything, but it comes close!  In Exporting Data in PBCS With Business Rules, I talk about exporting data with a business rule.  In Part 1 of my Groovy Series, I lay out how to execute a business rule with Groovy and how you can alter the Essbase calculation at run time.  If we put these two concepts together, we can set the name of the export to anything we want, even a system date.

The Date() method will return a date in a default format and inside a Groovy calculation it uses GMT time.  Since I am in EST, it is always 5 hours ahead.  So, if the date is printed at 5PM EST, the results is Wed Jan 16 22:00:00 GMT 2019.  This can be altered by formatting it to just about anything your heart desires.  I am sure you see where I am going.  If you google “format date Groovy” it will list nearly 50 options for date and time, AM/PM or military time, month as a number, 3 digit abbreviation, or the whole month, as examples.  For this example, the file to be just the system date.

Def currentDate =  new Date().format("MM_dd_yyyy")
// this returns the a two digit month, two digit day, and four digit year, separated by underscores

If you don’t want GMT, there is a trick.  The date method accepts a date.  It can be a fully qualified date like “1/15/19 22:00:00” or you can enter the seconds from January 1, 1970, 00:00:00 GMT.  This might sound crazy but in a Groovy calculation you can use currentTimeMillis() to get exactly that.  Again, since this is GMT, and EST is the want, add 3,600,000 milliseconds for each hour you want to change from GMT.  If these two methods are combined, the appropriate time can be obtained.

def adjEST = currentTimeMillis() + (3600000 * -5)
def currentDate =  new Date(adjEST).format("MM_dd_yyyy")
// This would give me the date 5 hours behind GMT

Now that we have the system date (and this is obviously my interpretation because I want it represented in my home time zone), we can combine this with the examples referenced above to export the data to a file with a name that includes the “system date.”

If you don’t know, the last string in a Groovy calculation is actually submitted to the calculation engine.  A stringbuilder is not required as noted in the examples.  The drawback of this is that we don’t have the option to log the actual calculation script.  This is more helpful when debugging and isn’t always critical to have documented in a production application via a log.  So, here goes!  The only change from the example is that we define a date variable as mm_dd_yyyy and pass that to the calculation.

// Get the date in EST and format as needed
def adjEST = currentTimeMillis() + (3600000 * -5)
def currentDate = new Date(adjEST).format("MM_dd_yyyy")

// Pass the calculation with the currentDate variable as the file name
"""
 SET DATAEXPORTOPTIONS
 {
 DataExportLevel LEVEL0;
 DataExportDynamicCalc OFF;
 DataExportNonExistingBlocks OFF;
 DataExportDecimal 4;
 DataExportPrecision 16;
 DataExportColFormat ON;
 DataExportColHeader Period;
 DataExportDimHeader ON;
 DataExportRelationalFile ON;
 DataExportOverwriteFile ON;
 DataExportDryRun OFF;
 }

 FIX(@Relative("Account", 0),
     @Relative("Years", 0),
     @Relative("Scenario", 0),
     @Relative("Version", 0),
     @Relative("Entity", 0),
     @Relative("Period", 0),
     @Relative("<em>custom_dim_name_1</em>", 0),
     @Relative("<em>custom_dim_name_1</em>", 0),
     @Relative("<em>custom_dim_name_1</em>", 0))
  DATAEXPORT "File" "," "/u03/lcm/${currentDate}.txt" "";
 ENDFIX
"""

This would produce a file in the inbox named 01_16_2019.txt.  By adding a parameter and formatting it to the date we want the file to be named, we have our solution.  Two additional lines and adding the parameter to the Essbase calculation is all that is required.

Part Two – Without Groovy

This is a little more difficult without Groovy.  I have not found a way to use something like the following as the file name.  If a reader sees this and knows of a way a way to do this, please share it and post a comment.

@CONCATENATE (@CONCATENATE ("/u03/lcm/", @FORMATDATE(@TODAY(),"mm_dd_yyyy")),".txt")

I assume in the original question that the ask is really not to have a file in the inbox with a specific name.  By using EPMAutomate and execute the calculation with a static name, the file can be download and renamed.  A simple PowerShell script could be used to rename the file.  If there really is a need to have this in the inbox, it can be uploaded.  I don’t know of any method that exists to rename an existing file with EPMAutomate.

$localFile = "c:\PBCS_Downloads\"
$exportFileName = "DataExport.txt"
Start-Process "epmautomate downloadfile ""$exportFileName"""
# Assume the script is executed from c:\PBCS_Downloads\ or the file is moved to this folder
$fileObj = get-item "c:\PBCS_Downloads\dataexport.txt"
rename-item "$($fileObj.FullName)" "$(Get-Date -Format "MM_dd_yyyy")$($fileObj.Extension)"
Start-Process "epmautomate uploadfile ""$($fileObj.DirectoryName)\$(Get-Date -Format ""MM_dd_yyyy"")$($fileObj.Extension)"""

Challenge Completed

Another challenge accepted has been easily completed.  Keep them coming!