1

Recommended Settings for Oracle Hyperion Products

Problem

Oracle has recommended settings for Internet Explorer (IE7, IE8, IE9, IE10 and IE11) when using Hyperion products.  I get this question a lot from my clients, so I thought I would share Oracles suggested settings.  Without changing these, there will be intermittent problems, and frustration points.

Solution

Configure browser to check for new version every time user visits a page

  • Open Internet Explorer
  • Go to Tools > Internet options > General
  • In “Browsing history” section click on “Settings” button and then select “Every time I visit the webpage” option
  • Click OK, then Apply.

Disable default pop-up blocking

  • Open Internet Explorer
  • Go to Tools > Internet options > Privacy tab
  • Uncheck “Turn on Pop-up Blocker”

Add Workspace URL to trusted sites

  • Open Internet Explorer
  • Go to Tools > Internet options > Security tab
  • Select “Trusted sites” from “Select a zone to view or change security settings” window, then click on “Sites” button.
  • Type your workspace URL in form http://workspaceserver:portnumber in “Add this website to the zone”
  • Uncheck “Require server verification (https:) for all sites in this zone”
  • Click Add, then Close.
  • Click OK and Apply.

Customize security settings

  • Open Internet Explorer
  • Go to Tools > Internet options > Security tab
  • Select “Trusted sites” from “Select a zone to view or change security settings” window
  • Select zone containing your Oracle Hyperion servers and click on “Custom level…” button
  • In “Miscellaneous” section enable options “Access data sources across domains” and “Allow script-initiated windows without size or position constraints”
  • In “ActiveX controls and plug-ins” section enable “Run ActiveX controls and plug-ins” and “Script ActiveX controls marked safe for scripting”.
  • Click OK
  • Click Apply, then OK

Enable option “Always allow session cookies”.

  • Open Internet Explorer
  • Go to Tools > Internet options > Privacy Tab > Advanced. Check the “Override automatic cookie handling”, accept the first and third party cookies and check the “Always allow session cookies” option.

Only for SSL enabled environments: Disable option “Do not save Encrypted Pages to Disk”.

  • Open Internet Explorer
  • Go to Tools > Internet options > Advanced Tab. In “Security” section uncheck the option “Do not save Encrypted Pages to Disk”.

Disable option “Enable Native XMLHTTP”. This setting is recommended only for customers using HFM 9.3.1 or older with IE 7. If you are using version 11.1.1.x of EPM products or newer, this option should be enabled.

  • Open Internet Explorer
  • Go to Tools > Internet options > Advanced Tab. In “Security” section uncheck the option “Enable Native XMLHTTP”.

Using Internet Explorer 9 Compatibility View option.

  • Open Internet Explorer
  • For 11.1.2.1.600 Planning and EPMA: Compatibility View should be enabled in Tools > Compatibility View Settings
  • For EPM 11.1.2.2 products: Go to Tools > Compatibility View Settings. Make sure EPM Workspace URL is not enabled for Compatibility View and uncheck all available options at the bottom of the pop-up window.

For products using JRE Plugin (Web Analysis, Performance Scorecard, Administration Services) make sure that a compatible version of plugin is installed on the client machine.

  • Check JRE Plugin certification for your EPM product in support matrix
  • Check installed Java version in Control Panel > Java > General > About. If required update Java version to a supported release.
  • Enable option “Always Auto-Download” in Control Panel > Java > Advanced > JRE Auto-Download=

Using Internet Explorer 11 Enterprise Mode. Limited support with EPM 11.1.2.2.500 and 11.1.2.3.500. For more information see Document 1920566.1.


BUG REPORT – Shared Members Security in EPMA

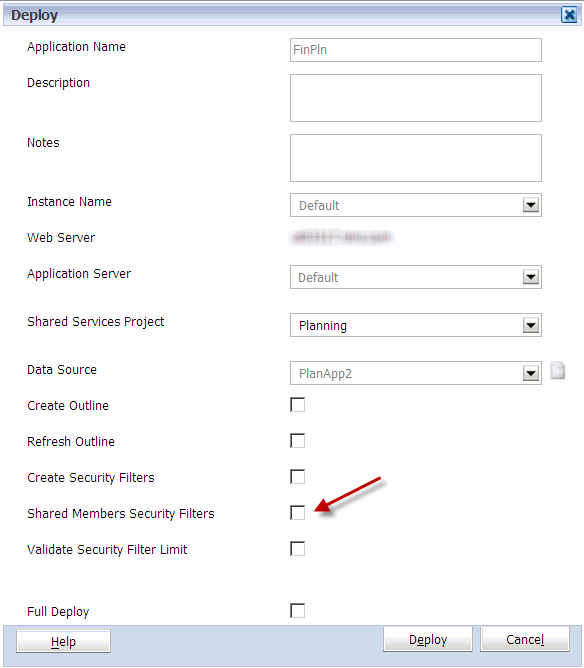
Oracle has confirmed a bug related to the deployment of security with a planning application maintained in EPMA in version 11.1.2.x.  When the Shared Members checkbox is selected in an EPMA deployment of a Planning application, it ignores this option.  Even if the Shared Members box is checked, the user still only gets access to Ohio Region, and not the children, in the example below.   Oracle is currently working on a patch.

What Does Checking Shared Members Do?

By default, any member that is a shared member under a parent with security, it gets excluded.  For example, if the security for Ohio Region is set to @IDESCENDANTS with READ access, the three members below Ohio Region would have no access.
– Ohio Region
– Columbus (Shared)
– Cincinnati (Shared)
– Cleveland (Shared)

The filter that gets pushed to Essbase would look something like this.

@REMOVE(@IDESCENDANTS(“Ohio Region”),@SHARE(@IDESCENDANTS(“Ohio Region”)))

When the shared members are checked, it tells Hyperion that you want to include shared members in the security.  The same example above, with shared members selected, would give users access to all 3 members.  The filter that gets pushed to Essbase would then look like this.

@IDESCENDANTS(“Ohio Region”)

The Workaround

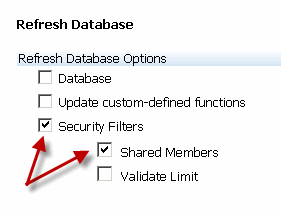
The workaround for this is to deploy the hierarchies from EPMA, and Refresh the database (security only) with Shared Members selected from Hyperion Planning.

When a patch is released, we will release the details.


Join Us In San Antonio!

KScope12 is the premier conference for Hyperion techies and up-and-comers. Whether you are looking to brush up on your skills, learn new skills, or see how others overcome challenges, you will want to participate in this event. If your organization values your development and has a budget for these growth opportunities, mark your calendar for June 24th through the 28th. Registration is open, and as more information is available, it will be published at In2Hyperion.

Presenting a topic is a great way to reduce the cost of the trip. It’s a great way to get your name out in the community as well. If you have something that you think would be valuable for other experts to hear about, submit an abstract.

We hope to see you there. Visit www.kscope12.com for all travel details and abstract submissions.


Hyperion Troubleshooting and Debugging Guide Part 2 of 2

This section will talk about how to dive into debugging critical issues with Oracle EPM.

Start a Problem Log

The most useful habit to develop during issue resolution is to start a detailed log about the issue. Some problems can take days or weeks to resolve and require trying hundreds of different prospective resolution attempts. It is easy for a “small” problem to become a long winded issue. Consequently, it is hard to foresee when the issue will resemble the analogous onion: keep peeling off layers and finding more and more to fix. If the problem log is created initially, all the important details can be captured. Additionally, it is much easier to bring others up to speed (management) and create support tickets when all of the information is documented. This log should include the error as the end user sees it, the error from any logs you are able to capture, screenshots, timestamps, and things that you have tried along with the results.

Reproduce the Issue

The first thing to find out is whether the issue is reproducible. It is very difficult to solve an issue that is not reproducible. Many errors are simply ‘glitches’ and may have been caused by a very improbable event, such as a database hiccup. For instance, a database problem propagates into the Oracle EPM system, forcing it into a bad state. Such a problem may never produce itself again. Consequently, an initial step toward resolution is to restart the Oracle EPM services to bring them back into a ‘known state’. If the problem is not immediately reproducible after the restart, go back to the problem log and record everything you can. This type of issue will need to be profiled over a period of time to try and discover patterns if it occurs again.

The Numerous Logs

Once it is discovered that the issue is not a simple glitch, it is time to start digging. As mentioned previously, the first place to track down the cause of an issue is in the logs. The logs come in various forms. Here is a general breakdown of the log types:

 General

Log Type Description
Windows Event Viewer This is helpful for general system related messages. Also some modules built on Windows Technology (DCOM) will log messages here. For example, Financial Management (HFM) and Financial Data Quality Management (FDQM).
Application Logs The application logs are actually generated by the Hyperion code itself. These often contain the most useful information.
Application Server Logs This type of log pertains to a Java based Web Application. Most of the Hyperion modules with a web based front end have Application Server Logs. The Application Server Logs run within the WebLogic, Tomcat, or WebSphere container.
Web  Server logs The web server controls the handoff of web requests between the Hyperion Modules. The best way to use this log is to look for error codes (404, 401… etc) in the web log and review the corresponding URL that was used to ensure it is correct. Sometimes it might be obvious that the URL in the web log has the wrong domain, points to the wrong server, or cannot resolve the context.


Start by reviewing the log for the product where the error is occurring. The Application Logs and Application Server Logs will be most useful at first. The goal is to find a useful error message that can be used in the next process to find a resolution to the problem.

Common Log Locations:

Unfortunately, the actual log locations change drastically between recent versions of Oracle/Hyperion products. As stated before, searching for *.log might be useful.

Example Application Server Logs:

Essbase Admin Services Svr2 /Oracle/Middleware/user_projects/domains/EPMSystem/servers/EssbaseAdminServices0/logs
Workspace Svr1 /Oracle/Middleware/user_projects/domains/EPMSystem/servers/FoundationServices0/logs
Financial Reporting Svr1 /Oracle/Middleware/user_projects/domains/EPMSystem/servers/FinancialReporting0/logs
Analytic Provider Services Svr2 /Oracle/Middleware/user_projects/domains/EPMSystem/servers/AnalyticProviderServices0/logs
Web Analysis Svr1 /Oracle/Middleware/user_projects/domains/EPMSystem/servers/WebAnalysis0/logs


Example Application Logs

Reporting and Analysis Core Svr3 /Oracle/Middleware/user_projects/epmsystem1/diagnostics/logs/ReportingAnalysis/


/Oracle/Middleware/user_projects/epmsystem1/diagnostics/logs/ReportingAnalysis/stdout_console_default.log


Essbase Svr4 /Oracle/Middleware/user_projects/epmsystem1/diagnostics/logs/essbase/


Sifting Through the Logs:

It helps to know which modules depend on each other in order quickly pick out the respective log files to analyze. The basic idea is to determine which products are interacting and to review each log in detail for messages. It is important to review the logs of the product not only during runtime (as it is happening), but also during startup. Sometimes the fastest way to cut out the fluff is to stop the services, move or delete all the existing logs and start the environment back up. This ensures any log messages are relevant to the issue. Alternatively, one has to sift through potentially large logs looking for timestamps to ensure relevance, which can be daunting.

Product Depends On
Shared Services Relational Database, MSAD/LDAP
Lifecycle Management (LCM) Shared Services, LCM Source/Target applications
Essbase Shared Services
Hyperion Planning Shared Services, Essbase, Business Rules, Relational Database per App
Business Rules Shared Services, Hyperion Planning, Essbase, Relational Database (single database)
Hyperion Financial Management Shared Services, Relational Database (single database), DCOM (Event Viewer)
Financial Data Quality Management (FDM) Shared Services, Relational Database per App, Adapters for Essbase, Planning, HFM…etc, DCOM (Event Viewer)
Strategic Finance Shared Services, Relational Database (optional)
Data Relationship Management Shared Services, Database Client, Adapters, DCOM (Event Viewer)


Found an Error Message!

After discovering the error message, the first thing to ask is does this message make any sense? Try to use it within the context of your problem to solve the issue. Often, it is necessary to use external resources to resolve the issue. Use resources like Google, the Oracle Support Knowledgebase, and the Oracle Forums to further research the issue. Most often there will be information regarding your issue.

Note: If possible do not searching using end user messages, i.e. what the user sees when encountering the error.  Rather, find a detailed message in the logs. The end user messages are usually very generalized and can provide misleading information because of the vast number of issues which might match the general error message.

If there is still a struggle to discover a useful error message, most of the Hyperion modules use a logging mechanism that can be changed into debug mode. The actual method will differ based on product, for instance, most modules use log4j and there is often a .properties file you can change the logging level from “ERROR” or “WARN” to “DEBUG”. For instance, to enable debugging in Hyperion Planning: log into a Planning application, go to Administration -> Manage Properties, Select the System tab, Add the property DEBUG_ENABLED with a value of True. After changing the logging level, the service will need to be restarted to reflect the changes. Turning on application debugging should provide more context clues around what the product is doing at the time and help pinpoint the error.


Nothing Found…

If these resources do not help, an Oracle Support Ticket may be required. Additionally, the Oracle Forums can be a good place to post a question.  When creating a support ticket and posting to a forum, please include as much information as possible. This is where the Problem Log will come in handy.

This is a good time to look for updates and patches to the product. Check for patches and updates on http://support.oracle.com. Read the release notes for anything matching your problem. Even if there is nothing coming up, some obscure errors can be solved by simply applying a patch. Not all bugs will be in the release notes for the patch. Oracle’s hpatch process is pretty straight forward, but older environments might take some time to apply the patch. Always read the entire release notes and installation instructions before applying a patch. Also, sometimes patches are not as proven as the initial installers. This is because some patches may have just been release and only tested with a handful of clients. So ensure there is a good backup process in case the patch causes unintended problems. The Oracle hpatch process has a back out feature, but it is not always useful if the patch is half way installed and failed.

Finally, the last part of troubleshooting is intuition. As more problems are encountered and resolved, one can become more confident in resolving upcoming issues. There is no way to have encountered every issue and know the resolution, so the best that you can do is arm yourself with a good knowledge of the architecture, have a set of best practices, and lots of patience for problem solving.


Oracle EPM Troubleshooting and Debugging Guide (Part 1 of 2)

This article will discuss some best practices around troubleshooting and debugging your Oracle EPM environment.

Oracle EPM (Hyperion) is a complex system that is composed many modules that work together to perform different functions. Typically, in design, creating a modular approach is a best practice. However, the Oracle EPM modules were created with disparate architectures because they acquired over time through purchasing technology from many smaller companies. As a result, the modules interact only at a high level, through network APIs. The result is a complex system with many breaking points, and error messages that can be less than informative. Consequently, troubleshooting and debugging Hyperion is an art form.

The fastest way to debug a critical problem is to have a good understanding of what components represent a known, “good” state.  Only by identifying the abnormal element in the system can one start to resolve a critical issue.

Below Are Best Practices to Follow to Document a Known, Good State

What Should Be Running?

The first question you should ask is, “is everything up?” Typically you would start by checking the URLs you use for each product – ensuring you can login. These URLs would typically include the load balancing name.

Example of End User/Administrative URLs

Shared Services http://hyperion.svr.com/interop
Hyperion Planning http://hyperion.svr.com/HyperionPlanning
Essbase Admin Services  http://hyperion.svr.com/easconsole/console.html
Workspace http://hyperion.svr.com/workspace
Web Analysis http://hyperion.svr.com/WebAnalysis
FDM http://hyperion.svr.com/HyperionFDM

Set Up Port Monitoring Software

You can also get a ton of info in a quick glance by setting up port monitoring software. Remember to include the relational database in your monitoring. Sometimes the DBA will take the database down unexpectedly, or the database user IDs will expire. Additionally, it is easy to have 20-30 Hyperion related services or processes running per environment distributed among multiple hosts. It’s too time consuming and error prone to check manually.

An Example of a Custom Java Based Port Monitor

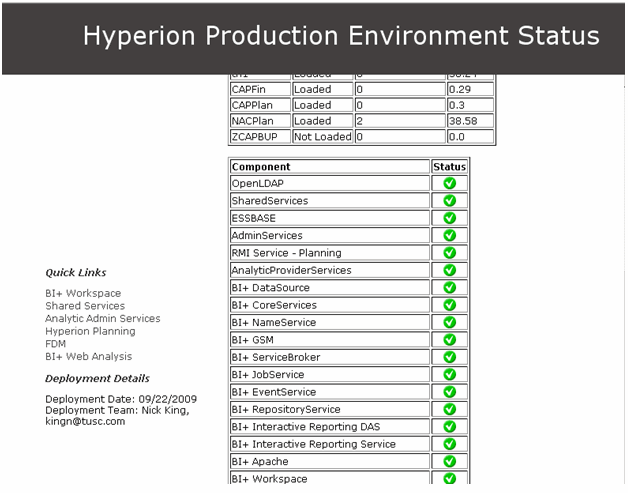
To gather a list of ports within the environment there are a few aids to use for reference. Oracle EPM Version 11 includes a diagnostics web form that will show the status of some of the products. This can be found under the Windows Start Menu, under Programs -> Foundation. This might be a good place to get started.

Also, refer to the Oracle EPM Documentation, Install Start Here Document for typical port reference.

http://download.oracle.com/docs/cd/E17236_01/epm.1112/epm_install_start_here.pdf

An Example of Some Common JVM Ports

Application Server Cluster/Node(s) Port
Workspace svr01 45000
Web Analysis svr01 16000
Financial Reports svr01 8200
Shared Services svr01 58080
Analytic Provider Services svr04 13080
Hyperion Planning svr02 8300
Strategic Finance svr04 7750
Essbase Admin Services svr04 10080
EPMA svr02 19091

Stopping and Starting the Environment

Operational procedures are important too. This means having a reliable start and stop procedure for the environment. Given the complexity of the Hyperion environment, there is no excuse for problems occurring while bringing an environment back up after routine maintenance. One common issue that comes up is a service did not start completely, which can be found by using the port monitoring method above. Also, sometimes the services do not fully stop – causing residual processes to mess up the restart procedure. This might include extra ESSVR processes indicating the Essbase application did not stop properly, or a JVM process which is hung. As a precaution, check the port monitoring software after stopping the environment to ensure all the components are indeed down. It is time consuming when this type of issue is encountered. In a Windows environment you might take the environment down through your normal process, then kill any remaining “Java” and “Hyperion” related processes using task manager. In a Unix environment, after stopping the environment, “kill -9 -1” can be used as a last resort. A reboot will always solve this type of issue, though not often actually needed; it might be faster as a last resort for the unskilled admin needing to fix unexplainable issues.

Functional Validation Script

Functional validation is a set of very simple actions that can be performed within a few minutes to validate the functionality of the environment. This is absolutely necessary to perform before handing the system back over to end users after a routine maintenance.  This task can be either performed by the Hyperion Admin or handed over to the Help Desk. It should, at a minimum, include running a few types reports (HFM, FR, WA), log into Essbase, Planning, HFM, etc… As you discover other reoccurring issues you may want to include more specific checks to ensure common “gotchas” are ironed out before handing over to the end users.

Knowledge of the Architecture

The Hyperion administrator has to be technologically savvy. However, many times Hyperion will tell you exactly what the problem is. The first place to look when encountering an issue is the logs! Take time to find and document the log files for every product in your environment.  Most administrators are a bit intimidated by the number of logs generated by the system, but this is the first place to look. Familiarize yourself with the various logs in the environment. This includes WebLogic logs, JVM logs, Hyperion logs, and operating system logs. If you are lost, a good place to start is search for *.log, sort by date, and look at the directory for the product name. You might even keep a record of each log after starting the service successfully so that you can compare to a good state if there is a problem.
Additionally, it is necessary to have context around how the environment works. This can be achieved by reading the product manuals, looking at architecture diagrams, and attending training sessions. Get involved in the environment. Try to understand both the technical details (ports, logs, different components…etc) and the functional basics (create a planning form, edit an outline, load data into Essbase, run a consolidation) of each Oracle Module.

A Good State: Create a Knowledge Base

Hyperion issues commonly come up more than once. Create a shared, searchable, knowledgebase to track issues and their resolutions. This will help you train your team as it expands and changes over time.

Final Comments

The focus of this article was to provide the Oracle EPM Administrator with best practices on how to document the current state of the Oracle EPM System. This is the most important part of being able to understand complex issues as they come up. More technical detail will be provided in the Oracle EPM Troubleshooting and Debugging Guide (Part 2 of 2).


Unique Essbase Customizations Using Java – Custom Logging

Introduction

Many companies have in depth working knowledge of Hyperion Essbase and are looking to enhance their enterprise reporting capabilities to the next level. Companies typically have specific processes and calculations that set them apart in their industry. However, they are often limited to basic reporting capabilities provided by the standard functions in Essbase. Additionally, complex operations can quickly become arduous using Calculation Scripts and Business Rules. This post will demonstrate the how to easily build Custom Java Routines to extend Essbase and dramatically reduce development time.

Complete details will be provided on how to implement a simple customized logging function for use in Calculation Scripts and Business Rules. Essbase’s streamlined, parallel nature makes it difficult for application developers to trace line by line. By using Java to implement a custom logging routine, one may use personalized log entries within their Essbase scripts. Consequently, developers can add tracing to their scripts and quickly determine how Essbase is approaching each calculation. Accordingly, application developers are able to see exactly how the script is being executed – providing quick debugging and faster development time. One powerful feature is to help determine block creation  within FIX statements.

The first step to integrating a custom Java routine into Essbase is to write some simple Java code. It is very easy – the code does not have to include any special APIs for Essbase.  During development, a few issues were encountered where Essbase was a bit picky about how the code is written.  Here are a few tips to help in getting started. These tips were gathered while doing real development, and it is best to follow at first, though you may revisit the items and find out what will work for you.

  • Do not include the code in a package such as “com.company.product_name” – remove the “package” declarative at the top of the code
  • Do not use the keyword “this” to refer to variables
  • Do not overload methods
  • Set all methods and variables to static

With these provisions in mind, the following code can be written to implement a custom logging routine.

CustomLoggerV2.java

import java.io.FileWriter;
import java.io.Writer;
import java.io.PrintWriter;
import java.io.StringWriter;
import java.util.Calendar;
import java.util.ArrayList;

public class CustomLoggerV2
{

    private static String logFile;
   
    public static int logFilterLevel;
   
    public static void setLogFilterLevel(int logFilterLevel2)
    {
        logFilterLevel = logFilterLevel2;
    }
   
    public static void setLogFilename(String logFilename)
    {
        logFilterLevel = 0;
        logFile = logFilename ;
    }

    public static synchronized void customLog (int logLevel, String message)
    {
        log(logLevel, message);
    }

    private static synchronized void log (int logLevel, String message)
    {
       
       
        // do not log
        if (logLevel < logFilterLevel)
            {
                return ;
            }
       
        try {
       
            Calendar c = Calendar.getInstance();
           
            FileWriter fw = new FileWriter(logFile, true);
               
            fw.write(c.getTime()   ": "   message   "\n");
            fw.close();
             
        } catch (Exception e)
            {
                System.out.println("Error, cannot open , "   logFile);
                e.printStackTrace();
            }
        }

 
}

The code implements three public methods:

  • setLogFilterLevel(int logFilterLevel) – sets the minimum message level to log (think about ERROR=100, WARN=90, INFO=70, DEBUG=0) – so you can easily change the verbosity of the output.
  • setLogFilename(String filename) – The full path to the log file you wish to use
  • customLog(logLevel, String message) – The log message, with its indicated priority

The next step is to package up the code above. It is important to use the same version of Java which is running your Essbase instance. To find the version, look for the JRE being used within the environment, for instance, Hyperion\common\JRE\Sun\1.5.0\bin. To obtain the specific revision, open a cmd prompt, cd to the bin directory, and run “java –version”.

E:\Hyperion\common\JRE\Sun\1.5.0\bin>java -versi
java version "1.5.0_11"

Java(TM) 2 Runtime Environment, Standard Edition (build 1.5.0_11-b03)

Java HotSpot(TM) Client VM (build 1.5.0_11-b03, mixed mode

To compile the code a JDK is required, which will contain the javac command. Hyperion only packages the JRE, meaning you will have to download the correct JDK in order to compile the code. You can find older versions of Java JDK from Oracle(Sun)’s web site. Once you have obtained the correct version of the JDK, compile and package up the code:

javac CustomLoggerV2.java

jar -cf CustomLoggerV2.jar CustomLoggerV2.class

Next, copy the CustomLoggerV2.jar file into the Essbase file structure:

Copy CustomLoggerV2.jar into the E:\Hyperion\products\Essbase\EssbaseServer\java\udf folder. If the udf folder does not already exist, create it.

Now it is time to start including the Java class within Essbase. Essbase runs within its own JVM and therefore has its own Java security. In the example above, we are writing to a local log file, which will violate the default security policy setup in the udf.policy file. The file is usually found in Hyperion\products\Essbase\EssbaseServer\java . The simplest way to get around the security concerns for development purposes is to remove the comment from the last line in the file, which effectively includes the directive “permission java.security.AllPermission”

permission java.util.PropertyPermission “java.vm.version”, “read”;

permission java.util.PropertyPermission “java.vm.vendor”, “read”;

permission java.util.PropertyPermission “java.vm.name”, “read”;

// Uncomment the following line if you want to remove all restrictions

permission java.security.AllPermission;

};

Now that the Essbase security and jar file have been put in, a restart of the Essbase process is required to register the changes. Please restart Essbase now.

The final step is to run some maxl statements to register the public java methods with Essbase.

CustomLoggerV2.mxl

create or replace function '@JCustomLoggerV2_setLogFilename'

as 'CustomLoggerV2.setLogFilename(String)'

spec '@JCustomLoggerV2.setLogFilename(absolute file name)'

comment 'Nicholas King'

with property runtime;

create or replace function '@JCustomLoggerV2_customLog'

as 'CustomLoggerV2.customLog(int, String)'

spec '@JCustomLoggerV2.customLog(log level, log message)'

comment 'Nicholas King'

with property runtime;


create or replace function '@JCustomLoggerV2_setLogFilterLevel'

as 'CustomLoggerV2.setLogFilterLevel(int)'

spec '@JCustomLoggerV2.setLogFilterLevel(filter level)'

comment 'Nicholas King'

with property runtime;

One final thing… In order to run a custom java function, the value of the result has to be stored in an Essbase member. This is true even if there is not any use for the return value, such as this case where there is no value returned from the Java methods. To get around this, create a new Essbase member called “No Measure” somewhere within your Essbase outline. This will act as a dummy member intended only to direct the return value, if any, of the Java methods. An example is shown below.

Sample Calc Script or Business Rule to Invoke the Logger

//ESS_LOCALE English_UnitedStates.Latin1@Binary

/* SETUP The Logger */

/* Fix on something so it runs only once */

FIX (Actual, Texas, "100-10")

"No Measure" = @JCustomLoggerV2_setLogFilename("E:\CustomEssbaseLog.log");

"No Measure" = @JCustomLoggerV2_setLogFilterLevel(50);

ENDFIX;

/* In your script, do some actual logging */

FIX (Actual, Texas, "100-10")

/* Won’t be displayed */

"No Measure" = @JCustomLoggerV2_customLog(0, "This is a debug message");

/* Will be displayed */

"No Measure" = @JCustomLoggerV2_customLog(50, "This is a normal message");

"No Measure" = @JCustomLoggerV2_customLog(100, "This is an important message");

ENDFIX;

The result of running the script is the log entries will be added to the log file E:\CustomEssbaseLog.log,

Mon Feb 21 01:30:25 EST 2011: This is a normal message

Mon Feb 21 01:30:25 EST 2011: This is an important message

Troubleshooting Tips

A very common error you may receive is,

Error: 1200324 Error compiling formula for [No Measure] (line 8): operator expected after [@JCustomLogger_customLog]

This error is a generic error that indicates something in your custom function is not registered properly.  Unfortunately, there is not a lot of detailed log information at this point to help discover the problem. If you receive this message a few things might help:

  • Retrace your steps – carefully review all instructions above
  • Check that the correct version of Java was used to compile the class file and package the jar
  • Check the jar is in the correct “udf” folder in Essbase
  • Check the syntax of the MAXL to register the functions is correct
  • Simplify your script as much as possible to reduce the possibility of syntax errors

Conclusion

This example shows how to create a custom Java based logger integrated into Essbase. The possibilities are endless – anything that can be done in Java can be added to Essbase. You can create development aids, or even read/modify the values within the cube. For instance, this model has successfully been used to perform complex financial calculations within Hyperion Planning Forms using Business Rules.  It could also be used for integrating Web Services with your cube by reading or writing cube data and interacting with an enterprise Web Service.

Initial Release of In2Hyp Services Manager – Restarting Services Just Got Easier!

As Hyperion applications have become more integrated, the need for multiple servers to support the environment is now required.  Although the recent releases of version 11 are less dependent on the order in which the services start, Hyperion still recommends a specific order to start the services so they perform correctly.  As these services are typically on multiple servers, it is time consuming to perform this operation and it is prone to error.  Many organizations lack the ability to automate this task when services are interrupted, or operating systems are updated, and there is no automated way to start and stop the services.

In2Hyperion is now making available HypServicesManager.  HypServicesManager is an application that will start or stop the services in a predefined order.  An XML file holds the server/service order so the services to be included, and the order in which they start/stop, is completely customizable.  It will impersonate a domain account that has permissions to the respective servers, so the starting or stopping of the services on multiple servers can be performed quickly and remotely.  With command line parameters, it can even be automated.

Keep in mind, HypServicesManager is completely independent of Hyperion services.  Although it was developed to fill the need to manage Hyperion services, it can be used for any windows service as it uses the windows APIs.

I have used this application in multiple organizations and it is often used in a production environment.  With that said, this has not been tested on thousands of environments in every Windows OS.  If it doesn’t work for you, we certainly welcome feedback and will make every effort to fix any bugs that are discovered.

Details on the use of the application are available here.


Essbase Database Restructures

Changes to an Essbase outline cause changes to the Essbase index and data files, regardless of the method (Essbase Administration Services, Hyperion Planning database refreshes, or from a script).

Changes that require restructuring the database are time-consuming (unless data is discarded before restructuring).  Understanding the types of restructures and what causes them can help database owners more effectively manage the impacts to users.

TYPES OF RESTRUCTURES

Essbase initiates an implicit restructure after an outline is changed, whether done with the outline editor, through an automated build, or some other fashion like a Hyperion Planning database refresh.  The type of restructure that is performed depends on the type of changes made to the outline.

DENSE RESTRUCTURE:  If a member of a dense dimension is moved, deleted, or added, Essbase restructures the blocks in the data files and creates new data files. When Essbase restructures the data blocks, it regenerates the index automatically so that index entries point to the new data blocks. Empty blocks are not removed. Essbase marks all restructured blocks as dirty, so after a dense restructure you must recalculate the database. Dense restructuring, the most time-consuming of the restructures, can take a long time to complete for large databases.

SPARSE RESTRUCTURE:  If a member of a sparse dimension is moved, deleted, or added, Essbase restructures the index and creates new index files. Restructuring the index is relatively fast; the time required depends on the index size.

Sparse restructures are typically fast, but depend on the size of the index file(s).  Sparse restructures are faster than dense restructures.

OUTLINE ONLY:  If a change affects only the database outline, Essbase does not restructure the index or data files. Member name changes, creation of aliases, and dynamic calculation formula changes are examples of changes that affect only the database outline.

Outline restructures are very quick and typically take seconds.

Explicit restructures occur when a user requests a restructure to occur.  This can be done in Essbase Administration Services or via Maxl (and EssCmd for those of you who still use it) and forces a full restructure (see dense restructure above).  It is worth noting that this also removes empty blocks.

CALCULATING IMPLICATIONS AFTER RESTRUCTURES

When a restructure occurs, every block that is impacted is tagged as dirty.  If Intelligent Calculations are used in the environment, they don’t provide any value when a dense restructure occurs as all blocks will be calculated.  When member names or formulas are changed, the block is not tagged as dirty.

WHAT DICTATES THE RESTRUCTURE TYPE

The following outline changes will force a dense restructure, which is the most time- consuming restructure.

DENSE AND SPARSE

  • Defining a regular dense dimension member as dynamic calc
  • Defining a sparse dimension regular member as dynamic calc or dynamic calc and store
  • Defining a dense dimension dynamic calc member as regular member
  • Adding, deleting, or moving dense dimension dynamic calc and store members
  • Changing dense-sparse properties [Calc Required]
  • Changing a label only property [Calc Required]
  • Changing a shared member property [Calc Required]
  • Changing the order of dimensions [Calc Required]

DENSE (DATA FILES)

  • Deleting members from a dense dimension  [Calc Required]
  • Adding members to a dense dimension
  • Defining a dense dynamic calc member as dynamic calc and store member

SPARSE (INDEX)

  • Adding members to a sparse dimension
  • Moving members (excluding shared members) in a sparse dimension
  • Defining a dense dynamic calc member as dynamic calc and store
  • Adding, deleting, or moving a sparse dimension dynamic calc member
  • Adding, deleting, or moving a sparse dimension dynamic calc and store member
  • Adding, deleting, or moving a dense dimension dynamic calc member
  • Changing the order of two sparse dimensions

NO RESTRUCTURE OCCURS

  • Deleting members of a sparse dimension [Calc Required]
  • Deleting members of an attribute dimension
  • Deleting shared members from a sparse or dense dimension [Calc Required]
  • Adding members to an attribute dimension
  • Adding shared members to a sparse or dense dimension
  • Moving a member in an attribute dimension
  • Renaming a member
  • Changing a member formula [Calc Required]
  • Defining a sparse dynamic calc member as dynamic calc and store member
  • Defining a dense or sparse dynamic calc and store member as dynamic calc
  • Defining a regular dense dimension member as dynamic calc and store
  • Defining a sparse dimension dynamic calc and store member or dynamic calc member as regular member
  • Defining a dense dimension dynamic calc and store member as regular member
  • Changing properties other than dense-sparse, label, or shared [Calc Required]
  • Changing the order of an attribute dimension
  • Creating, deleting, clearing, renaming, or coping an alias table
  • Importing an alias table
  • Setting a member alias
  • Changing the case-sensitive setting
  • Naming a level or generation
  • Creating, changing, or deleting a UDA

WHAT DOES THIS MEAN

Understanding this can help users and administrators manage applications to better meet the needs of all those involved.  When designing an application, knowledge of this topic can be instrumental in the success of the application.  Here are some things to keep in mind.

  • When updating an outline or refreshing a planning application, it may be faster to export level 0 (or input level) data, clear the data, perform the update, and reload/aggregate the export when  changes cause a dense restructure.
  • For dimensions that are updated frequently, it may be beneficial to define those dimensions as sparse.  Changes to sparse dimensions typically require only restructures to the index file(s), which are much faster.
  • If frequent changes are required, enabling incremental restructuring may make sense.  Using this defers dense restructures.  The Essbase restructure happens on a block by block basis, and occurs the first time the data block is used.  The cost is that calculations will cause restructures for all the blocks included and the calculation performance will degrade.
  • Setting the isolation level to committed access may increase memory and time requirements for database restructure.  Consider setting the isolation level to uncommitted access before a database restructure.
  • If multiple people have access to change the outline, outline logging may be useful.  This can be turned on by adding OUTLINECHANGELOG = TRUE in the essbase.cfg.
  • Monitoring progress of a restructure is possible when access to the server is granted.  Both sparse and dense restructures create temporary files that mirror the index and data files.  Data exists in the .pag files while indexes are stored in .ind files.  As the restructure occurs, there are equivalent files for each (pan for data files and inn for index files).  In total, the restructure should decrease the size of the ind and pag files, but the pan and inn files can be used for a general idea of the percent of completion.


Dynamically Referencing Members in Business Rules

Often times with a Hyperion Essbase or Planning application, an allocation of data will be required.  Many times, the allocation is simply moving data from one member to another.  When the number of members involved is large, developing the script can be time consuming.  When the members frequently change, the maintenance of the calculation can be a nuisance.

When the members involved in the allocation are similar on both sides (the from and the to), the following method can be employed to speed the development and limit, or eliminate, any maintenance required.

Requirement

The application has 50 members in which the data needs to be moved.  The data originates from an account coming from the general ledger.  The data needs to be moved to a new member that doesn’t exist in the chart of accounts.  The new member will exist in a different part of the hierarchy.

Solution

The first step is to create a corresponding member for each of the 50 accounts that need allocated.  These accounts will be identical to the original 50, except they will be prefixed with a “D” identifying them as a dummy, or made up, account.  Each of these new accounts will have a UDA of “allocation.”  The prefix of the member and the UDA are not critical.  They will likely be something more meaningful to the requirements.

GL Acct   Dummy Account
500345   D500345
500578   D500578
607878   D607878

Once the hierarchy is ready to handle the allocation, the following function can be used.  In layman’s terms, this only executes on the new members added (identified by the unique UDA) and makes them equal to the corresponding member without the added prefix.  We will assume that this is being executed on a scenario that equals “Actuals.”

FIX(@UDA(“allocation”))
/* Make the new member equal to the old member */
“Actuals” = @MEMBER ( @SUBSTRING ( @NAME(@CURRMBR(“Account”)) , 1));
/* Clear the old member */
@MEMBER ( @SUBSTRING ( @NAME(@CURRMBR(“Account”)) , 1)) = #Missing;
ENDFIX

Let’s assume that the UDA is NOT added to the new, or dummy, member.  If the UDA is on the originating member, the calculation would look like this.

FIX(@UDA(“allocation”))
/* Make the new member equal to the old member */
@MEMBER ( @CONCATENATE(“D”,@NAME(@CURRMBR(“Account”)))) = “Actuals”;
/* Clear the old member */
Actuals = #Missing;
ENDFIX

Now we can break down these functions. Remember, the calculations loop through all members in all dimensions.  In this example, setting the result equal to “Actuals” is simply making the account that the calculation is looking at, at that particular point in the loop, equal to whatever is on the other side of the equation.

@MEMBER ( @SUBSTRING ( @NAME(@CURRMBR(“Account”)) , 1))
There are four functions used in this string.

  • @MEMBER will convert a string to a member name
  • @SUBSTRING requires 2 parameters (3 optional).  The first is the larger string from which you want to take a smaller string.  The second is where to start, with 0 being the first character.  The third is how many characters to include.  If this is left blank, it will take all the characters to the right of the second parameter.
  • @NAME will convert a member to a string.
  • @CURRMBR gets the current member of a specified dimension.

Putting this all together, this calculation (from inside out) is getting the current member of the Accounts dimension (“d345678”).  It converts that member to a string.  It takes all the characters to the right of the first character (“345678”).  Then it converts the string back to a member.  At this point, we can set that member equal to something.

@MEMBER ( @CONCATENATE(“D”,@NAME(@CURRMBR(“Account”))))
The functions here are the same as above, except we are not removing the “d.”  We are adding it.

  • @CONCATENATE accepts two parameters and will combine those two in to one string

Putting this all together, this calculation (from inside out) is concatenating two strings, a “D” and the current member of the Accounts dimension (“d345678”).  It then converts the string to a member. At this point, we can set that member equal to something.

Benefits

By using these functions, the calculations can be much smaller, quicker to develop, and completely maintained by the outline.  This effectively gives the user community ownership on the maintenance.


Why is the maximum number of returnable rows in SmartView only 5,000?

Regardless of whether the perception of using SmartView for large queries is good or bad, the reality is that finance and accounting users require the ability to pull large volumes of information out of Essbase.  The only limit that I am aware of in the days of the Excel Add-In was the maximum number of rows Excel would allow (assuming the Essbase application cache settings were high enough to support it).  With SmartView, there is a limit.  The limit is controllable very easily, however.  The error that users may question an administrator follows.

“Cannot perform cube view operation. OLAP error (1020011): Maximum number of rows [5000] exceeded.”

To increase the maximum number of rows a user can retrieve, or submit, edit the service.olap.dataQuery.grid.maxRows property in the essbase.properties file.  The default is 5000. While editing this property, it may be benefitial to evaluate the size if the columns (.olap.dataQuery.grid.maxColumns), which is set to 255 by default.

Once this is updated, restart the Hyperion services.

The location of the essbase.properties file is dependent on the version of Essbase installed.  Start by going to the server with APS installed.

Location for version 9.3
%HYPERION_HOME%\AnalyticProviderServices\bin directory

Location for version 11
%HYPERION_HOME%\products\Essbase\aps\bin\