1

Learning Life Cycle Management (LCM): Command Line Security Synchronization

This purpose of this article is to introduce the command line Life Cycle Management(LCM) utility in Oracle EPM. The LCM tool can be used to export and import objects that can be found within the Oracle EPM Environment.   This includes Security, Essbase, Hyperion Planning, Financial Management … etc.  As once gets more familiar with LCM, one comes to realize how powerful the tool is and how empty life without LCM was. Without LCM some of the more detailed artifacts within an application were difficult to move between environments.  LCM provides a centralized mechanism for exporting and importing nearly all of the objects within an Oracle EPM application or module. The table below is listed to get an idea of all the facets of LCM.


Application Artifacts by Module

Module Artifacts
Shared Services User and Group Provisioning
Projects/Application Metadata
Essbase Files (.csc, .rpt, .otl, .rul)
Data
Filters
Partitions
Index and Page files (drive letters)
Application and Database properties
Security
EAS/Business Rules Rules
Locations
Sequences
Projects
Security
Hyperion Planning Forms
Dimensions
Application Properties
Security
Hyperion Financial Management Metadata
Data
Journals
Forms/Grids
Rules
Lists
Security
Financial Data Quality Management Maps
Security
Data
Metadata
Scripts
Security
Reporting and Analysis (Workspace) Reports
Files
Database Connections
Security


The LCM tool is integrated into the Shared Services Web Interface.  If can be found under the Application Groups tab. Within the application groups there are three main areas of interest:

  1. Foundation – includes Shared Services security such as Users/Groups and Provisioning.
  2. File System – This is where the exported files will go by default. The default location is to be stored server side, on the Shared Services server in the location: E:\Hyperion\common\import_export
    Under this main folder, the contents are broken out by the user account that performed the export. Within the export folder, there is an “info” folder and a “resource” folder. The info folder provides an xml listing of the artifacts contained within the export. The resource folder contains the actual objects that were exported.

    The LCM Command line tool provides more flexibility because it can be installed on any machine and the results can be directed to output to any local folder. Sometimes this is very useful if the Shared Services node is a Unix machine, and the LCM users are unfamiliar with Unix. Simply install the LCM Command Line Utility on the Windows machine and redirect its output to a local Windows folder using the –local command line option.

  3. Products and Applications – Each registered product will be listed and provide a mechanism to export and import the respective objects for the associated applications, Essbase, Planning…etc.


Going Command Line

The Shared Services LCM GUI is a great way to become familiar with the LCM tool. However, when it is time to start automating LCM tasks and debugging issues, the Command Line LCM utility is very helpful. To get started, the LCM Command Line tool requires a single command line argument, an xml file that contains the migration definition. The quickest way to obtain the xml file is to use the Shared Services LCM Web interface to select the objects you wish, select Define Migration to pull up the LCM Migration Wizard, and follow the prompts until the last step. Two options are presented, “Execute Migration” or “Save Migration Definition”. Choose “Save Migration Definition” to save the migration definition to a local file.


That is pretty much all there is to it… move the xml migration definition file to the location you have installed LCM. For instance, \Hyperion\common\utilities\LCM\9.5.0.0\bin, open a command line and run Utility.bat as indicated:

E:\Hyperion\common\utilities\LCM\9.5.0.0\bin>Utility.bat SampleExport.xml
Attempting to load Log Config File:../conf/log.xml
2011-03-20 11:50:49,015 INFO  - Executing package file - E:\Hyperion\common\util
ities\LCM\9.5.0.0\bin\SampleExport.xml
>>> Enter username - admin
>>> Enter Password----------
--2011-03-20 11:50:57,968 INFO  - Audit Client has been created for the server h
ttp://hyp13:58080/interop/Audit
2011-03-20 11:50:58,421 WARN  - Going to buffer response body of large or unknow
n size. Using getResponseBodyAsStream instead is recommended.
2011-03-20 11:51:03,421 INFO  - Audit Client has been created for the server htt
p://hyp13:58080/interop/Audit
2011-03-20 11:51:03,437 INFO  - MIGRATING ARTIFACTS FROM "Foundation/Shared Serv
ices" TO "/SampleExport"
2011-03-20 11:51:32,281 INFO  - Message after RemoteMigration execution - Succes
s. HSS log file is in - E:\Hyperion\common\utilities\LCM\9.5.0.0\logs\LCM_2011_0
3_20_11_50_48_0.log
2011-03-20 11:51:32,687 INFO  - Migration Status - Success

E:\Hyperion\common\utilities\LCM\9.5.0.0\bin>


LCM Example: Synchronizing Shared Services Security between Environments

LCM often requires moving objects and security between environments, such as from a development environment to a production environment. While LCM makes it easy, it is not as straightforward as simply running an export from one environment and importing into another environment. The reason is that LCM imports work in a “create/update” mode. In other words, the operations performed in LCM are typically additive in nature. While the typical LCM method would capture new users and new application provisioning, it will not handle removing user provisioning, removing or changing groups, or essentially removing users from the system. This can be an easy oversight, but it will ensure that the security becomes out of sync over time and can cause issues as well as security implications. At a high level, the steps to sync provisioning using LCM would be:

  1. Export Users/Groups/Provisioning from Source Environment
  2. Export Users/Groups from Target Environment
  3. Delete Using Step 2 Results the Users/Groups in Target Environment
  4. Import Users/Groups/Provisioning into Target Environment

Essentially, Step 1 and 4 are the typical import/export operations – where security is exported from one environment and imported into another environment. However, two additional steps are necessary. In Step 3, the users and groups in the target environment are deleted, removing provisioning too. This leaves an empty, clean environment to then import security, ensuring no residual artifacts remain in the environment. To use the LCM delete operation, a list of items to be deleted must be supplied. This is where Step 2 comes in, a simple export of the Users and Groups in the Target environment will provide the necessary information to provide to Step 3 – deleting the respective users and groups.

Below are some sample XML migration definitions for each step:


Step 1 – Export Users/Groups/Provisioning from Source Environment

Note: By default the results will be sent to the source Shared Services server in the “import_export” directory. You can use LCM to redirect the output to keep the results all in the same environment (the target system) by using the command line option [-local/-l] (run utility.bat without any command line options to see help for your version of LCM). Simply redirect the results into the local folder, \Hyperion\common\import_export, in the Target system.

<?xml version=”1.0” encoding="UTF-8"?>
<Package name="web-migration" description="Migrating Shared Services to File System ">
    <LOCALE>en_US</LOCALE>
    <Connections>
        <ConnectionInfo name="MyHSS-Connection1" type="HSS" description="Hyperion Shared Service connection" url="http://sourceSvr:58080/interop" user="" password=""/>
        <ConnectionInfo name="FileSystem-Connection1" type="FileSystem" description="File system connection" HSSConnection="MyHSS-Connection1" filePath="/Step1ExportFromSource"/>
        <ConnectionInfo name="AppConnection2" type="Application" product="HUB" project="Foundation" application="Shared Services" HSSConnection="MyHSS-Connection1" description="Source Application"/>
    </Connections>
    <Tasks>
        <Task seqID="1">
            <Source connection="AppConnection2">
                <Options>
                    <optionInfo name="userFilter" value="*"/>
                    <optionInfo name="groupFilter" value="*"/>
                    <optionInfo name="roleFilter" value="*"/>
                </Options>
                <Artifact recursive="false" parentPath="/Native Directory" pattern="Users"/>
                <Artifact recursive="true" parentPath="/Native Directory/Assigned Roles" pattern="*"/>
                <Artifact recursive="false" parentPath="/Native Directory" pattern="Groups"/>
            </Source>
            <Target connection="FileSystem-Connection1">
                <Options/>
            </Target>
        </Task>
    </Tasks>
</Package>

Step 2 – Export Users / Groups from Target Environment

<?xml version="1.0" encoding="UTF-8"?>
<Package name="web-migration" description="Migrating Shared Services to File System ">
    <LOCALE>en_US</LOCALE>
    <Connections>
        <ConnectionInfo name="MyHSS-Connection1" type="HSS" description="Hyperion Shared Service connection" url="http://targetSvr:58080/interop" user="" password=""/>
        <ConnectionInfo name="FileSystem-Connection1" type="FileSystem" description="File system connection" HSSConnection="MyHSS-Connection1" filePath="/Step2UsersGroupsTarget"/>
        <ConnectionInfo name="AppConnection2" type="Application" product="HUB" project="Foundation" application="Shared Services" HSSConnection="MyHSS-Connection1" description="Source Application"/>
    </Connections>
    <Tasks>
        <Task seqID="1">
            <Source connection="AppConnection2">
                <Options>
                    <optionInfo name="userFilter" value="*"/>
                    <optionInfo name="groupFilter" value="*"/>
                </Options>
                <Artifact recursive="false" parentPath="/Native Directory" pattern="Users"/>
                <Artifact recursive="false" parentPath="/Native Directory" pattern="Groups"/>
            </Source>
            <Target connection="FileSystem-Connection1">
                <Options/>
            </Target>
        </Task>
    </Tasks>
</Package>

Step 3 – Delete Users/Groups in Target Environment

<?xml version="1.0" encoding="UTF-8"?>
<Package name="web-migration" description="Migrating File System to Shared Services">
    <LOCALE>en_US</LOCALE>
    <Connections>
        <ConnectionInfo name="MyHSS-Connection1" type="HSS" description="Hyperion Shared Service connection" url="http://targetSvr:58080/interop" user="" password=""/>
        <ConnectionInfo name="AppConnection1" type="Application" product="HUB" description="Destination Application" HSSConnection="MyHSS-Connection1" project="Foundation" application="Shared Services"/>
        <ConnectionInfo name="FileSystem-Connection2" type="FileSystem" HSSConnection="MyHSS-Connection1" filePath="/Step2UsersGroupsTarget" description="Source Application"/>
    </Connections>
    <Tasks>
        <Task seqID="1">
            <Source connection="FileSystem-Connection2">
                <Options/>
                <Artifact recursive="false" parentPath="/Native Directory" pattern="Users"/>
                <Artifact recursive="false" parentPath="/Native Directory" pattern="Groups"/>
            </Source>
            <Target connection="AppConnection1">
                <Options>
                    <optionInfo name="operation" value="delete"/>
                    <optionInfo name="maxerrors" value="100"/>
                </Options>
            </Target>
        </Task>
    </Tasks>
</Package>

Step 4 – Import Users and Groups into Clean Target Environment

This step assumes that Step 1 was redirected onto the target environment within the import_export directory. The respective folder, Step1UsersGroupsSource, can also be manually copied from the source to the target environment without using the redirection to a local folder technique.

<?xml version="1.0" encoding="UTF-8"?>
<Package name="web-migration" description="Migrating File System to Shared Services">
    <LOCALE>en_US</LOCALE>
    <Connections>
        <ConnectionInfo name="MyHSS-Connection1" type="HSS" description="Hyperion Shared Service connection" url="http://targetSvr:58080/interop" user="" password=""/>
        <ConnectionInfo name="AppConnection1" type="Application" product="HUB" description="Destination Application" HSSConnection="MyHSS-Connection1" project="Foundation" application="Shared Services"/>
        <ConnectionInfo name="FileSystem-Connection2" type="FileSystem" HSSConnection="MyHSS-Connection1" filePath="/Step1UsersGroupsSource" description="Source Application"/>
    </Connections>
    <Tasks>
        <Task seqID="1">
            <Source connection="FileSystem-Connection2">
                <Options/>
                <Artifact recursive="true" parentPath="/Native Directory" pattern="*"/>
            </Source>
            <Target connection="AppConnection1">
                <Options>
                    <optionInfo name="operation" value="create/update"/>
                    <optionInfo name="maxerrors" value="100"/>
                </Options>
            </Target>
        </Task>
    </Tasks>
</Package>

Troubleshooting with Command Line LCM

LCM can be a great tool when it works flawlessly. However, it can quickly become part of mission critical activities like promoting artifacts from development to production. Consequently, it is necessary to learn some troubleshooting skills to maintain business continuity using LCM.

  1. Review the output of the LCM operation. Usually it will provide some detail about the error that was received.
  2. Review the server side Shared_services_LCM.log in ORACLE_HOME\logs\SharedServices\SharedServices_LCM.log
  3. Turn on debugging for the command line LCM tool. Change the line “info” to “debug” in the files
    E:\Hyperion\common\utilities\LCM\9.5.0.0\conf in log.xml and hss-log.xml
    <param name=”Threshold” value=”info” />
  4. Use Google, the Oracle Knowledgebase to search for more information.
  5. Try only a subset of the initial objects. For instance, Essbase can export a number of objects, Outline, Calc Scripts, Rule Files, Report Scripts, Substation Variables, Location Aliases, and Security. Try one at a time to determine which part of the whole is failing.
  6. Restart the environment. LCM is an emerging technology and can sometimes just be in a bad state. I’ve seen countless LCM issues where bouncing the environment clears the issue up.
  7. Look for special characters that might be present in your data. LCM is a java tool and uses xml and text files to transmit data. There are instances where special characters can mess up the parsing.
  8. Look for patches – as mentioned previously, LCM is an emerging technology and is still somewhat buggy (especially older versions). Check release notes in patches for enhancements/bug fixes in LCM.

Empower Users To Improve Calculation Times

As an Essbase user, you have more power to improve performance than you think.  How many times do you lock and send data through Excel, SmartView, or web forms, that include zeros?  How many times do you allocate data to a finite level out of convenience?  Understanding what this does to Essbase is critical to understanding how a user can negatively impact performance without adding any value to the analysis or the results the database produces.

I analyzed a planning database used in one of the largest financial institutions in the world.  Over 60% of the values entered were zero.  Another 20% of the values were less than 1 dollar.  By eliminating the zeros, the total calculation time of the planning application was under 20 minutes.  With the zeros, it was nearly 2 hours.

There are two reasons for this.  First, there is a different between empty and zero.  Empty consumes no space to store whereas a zero consumes the same space as 1 billion.  Think of this as a grocery bag.  If you fill a grocery bag with nothing, it takes up no space.  If you fill it with empty cans (a zero), it consumes the same amount of space as if those cans were full (1 billion).

The example below is very common.  Assume that a forecast needs to be done for the last 3 months of the year.  Frequently, a spreadsheet would hold zeros for the first 9 months.  18 cells have zero and 6 cells have a positive value.  That means that 75% of your data could be eliminated by not loading zeros.

The same load with #Missing is more effective.

I highly recommend reading the article explaining dense and sparse to understand what a block is and what it represents before you continue this article.

There is also another very significant factor in loading zeros.  Loading a zero that creates a block just to hold a value of zero can explode the size of the database, as well as the time it takes to consolidate and execute business rules.  The more blocks that have to be loaded and consolidated, the longer it takes to finish.  If each block was a spreadsheet and you had to do this manually, you would have to open each spreadsheet and enter the number into a calculator to consolidate.  If 75% of the blocks you opened were zero, it wouldn’t change your total, but it would drastically increase the time it takes because you still have to open each spreadsheet.   If an Essbase database has 1,000 blocks, and 75% of them only hold zeros, it will likely take 2 or 3 times longer to calc the zeros because it still has to open the block and add the zero.  Remember, a zero acts no differently than a value of 100.

As an example to the above, the following example would create a block for South and West, inflating the database size.


Users can significantly reduce this unnecessary explosion in size by loading a blank as apposed to a zero.  If zeros are already in the database, leaving the cell blank will NOT overwrite the zeros.  If zeros are loaded inadvertently, a #Missing has to be used to remove them.

For all you users loading data, it can be a hassle removing the zeros.  Being responsible can significantly improve your experience with Essbase.  To make it easier, take a look at the function in the In2Hyperion Excel Ribbon that replaces all zeros with #Missing.


Altering Large Numbers Of Cells In Excel A Hundred Times Quicker

Many processes need to write large volumes of data in Excel.  The typical method is to loop through each cell and perform the action.

   Dim CellsDown As Long
   CellsAcross As Long

   Dim CurrRow As Long
   CurrCol As Long
   Dim CurrVal As Long

   '  This can be replaced with the selected range and is just used to illustrate this example.
   CellsDown = 1000
   CellsAcross = 36

   '   Loop through cells and insert values
   CurrVal = 1
   Application.ScreenUpdating = False
   For CurrRow = 1 To CellsDown
       For CurrCol = 1 To CellsAcross
           Range("A1").Offset(CurrRow - 1, CurrCol - 1).Value = CurrVal
           CurrVal = CurrVal   1
       Next CurrCol
   Next CurrRow

Rather than writing the values out cell by cell, it is quicker to store the value in an array and write the array to a range of cells at one time.

   Dim CellsDown As Long
   CellsAcross As Long

   Dim CurrRow As Long
   CurrCol As Long
   Dim CurrVal As Long

   Dim TempArray() As Double

   '  This can be replaced with the selected range and is just used to illustrate this example.
   CellsDown = 1000
   CellsAcross = 36

   '   Update the array
   ReDim TempArray(1 To CellsDown, 1 To CellsAcross)
   Set TheRange = Range(Cells(1, 1), Cells(CellsDown, CellsAcross))

   '   Fill the temporary array
   CurrVal = 0
   Application.ScreenUpdating = False
   For i = 1 To CellsDown
       For j = 1 To CellsAcross
           TempArray(i, j) = CurrVal
           CurrVal = CurrVal   1
       Next j
   Next i

   '   Transfer temporary array to worksheet
   TheRange.Value = TempArray

This same method can be used when altering data.  By changing the following line

            TempArray(i, j) = CurrVal

To this

            TempArray(i, j) = TheRange(i, j) * 3

By using TheRange(i, j), the existing value can be altered


The process of writing values cell by cell took 3.16 seconds.  Using the array method, it took .08 seconds, nearly 40 times faster


Getting large numbers in FR Reports?

When using Workspace to view reports, some users have seen excessively large numbers that don’t belong. If you are having this issue, it could very well be because the default Essbase query engine in 11.1.1.x is the MDX query engine, which can cause documented bug 9062413. Essentially, this bug will cause users to see the same astronomical number in every cell that sits on an intersection to which the user does not have security access. Understandably, this can cause some concern. This issue is expected to be fixed in a future release, but until then, the query engine will need to be manually changed.
The first option is to fix the issue at a report level. This is a relatively quick process and is a good idea if you only have a handful of reports.  To change the query engine setting for a particular report, follow the steps below:

1. Open the report.
2. For each grid, select the entire grid.
3. Right-click and select Data Query Optimization Settings.
4. Deselect the option “Essbase Queries Use MDX.”
5. Save the report.

Repeat the above process for each report.

For users that have a larger number of reports, a better option may be to change the query engine in the properties file on the server.  The benefit to fixing the issue in the properties file is that changes only need to be made once, and all reports will reflect this change.
The file that needs to be edited is located on the Financial Reporting (app) server, typically on the path D:\<Hyperion Home>\products\biplus\lib where <Hyperion Home> represents the root location of the Hyperion install. The file that needs adjusted is the fr_global.properties file.
Open the properties file and add these lines:

# MDX Query Engine has been set as the default in Essbase 11.1.1.x. This can cause bug 9062413 
# which may cause unauthorized users to see a long series of numbers in each cell when running  
# reports. To solve this issue, the below line was added, which switches the query engine.
EssbaseUseMDX=false

Any line preceded by “#” is commented out. Therefore, these can say whatever you prefer, but should give anyone that views this file a good indication why this text is in the file.

Once the properties file has been updated, the following services must all be stopped in the following order, then started in the same order for the changes to take effect.

1. Hyperion Financial Reporting – Print Server
2. Hyperion Financial Reporting – Report Server
3. Hyperion Financial Reporting – Scheduler Server
4. Hyperion Financial Reporting – Web Application (Note – This service may be on the FR (Web) server, not the FR(App) server like the other three services.)

Note – This modification will apply to everyone using the server on which they are made, so be careful when making changes to a shared server.


Altering Large Numbers Of Cells In Excel A hundred Times Quicker

Many processes need to write large volumes of data in Excel.  The typical method is to loop through each cell and perform the action.

   Dim CellsDown As Long
   CellsAcross As Long

   Dim CurrRow As Long
   CurrCol As Long
   Dim CurrVal As Long

   '  This can be replaced with the selected range and is just used to illustrate this example.
   CellsDown = 1000
   CellsAcross = 36

   '   Loop through cells and insert values
   CurrVal = 1
   Application.ScreenUpdating = False
   For CurrRow = 1 To CellsDown
       For CurrCol = 1 To CellsAcross
           Range("A1").Offset(CurrRow - 1, CurrCol - 1).Value = CurrVal
           CurrVal = CurrVal   1
       Next CurrCol
   Next CurrRow

Rather than writing the values out cell by cell, it is quicker to store the value in an array and write the array to a range of cells at one time.

   Dim CellsDown As Long
   CellsAcross As Long

   Dim CurrRow As Long
   CurrCol As Long
   Dim CurrVal As Long

   Dim TempArray() As Double

   '  This can be replaced with the selected range and is just used to illustrate this example.
   CellsDown = 1000
   CellsAcross = 36

   '   Update the array
   ReDim TempArray(1 To CellsDown, 1 To CellsAcross)
   Set TheRange = Range(Cells(1, 1), Cells(CellsDown, CellsAcross))

   '   Fill the temporary array
   CurrVal = 0
   Application.ScreenUpdating = False
   For i = 1 To CellsDown
       For j = 1 To CellsAcross
           TempArray(i, j) = CurrVal
           CurrVal = CurrVal   1
       Next j
   Next i

   '   Transfer temporary array to worksheet
   TheRange.Value = TempArray

This same method can be used when altering data.  By changing the following line

            TempArray(i, j) = CurrVal

To this

            TempArray(i, j) = TheRange(i, j) * 3

By using TheRange(i, j), the existing value can be altered


The process of writing values cell by cell took 3.16 seconds.  Using the array method, it took .08 seconds, nearly 40 times faster


Recovering An Essbase Application From a Corrupt Data File

It is possible for a database in Essbase to become corrupt.  This can be caused by server hangs, software glitches, and a variety of other reasons.  Although infrequent, if a database cannot be loaded for any reason, and it needs to be restored, the following actions can be a quick resolution.  Keep in mind that this will remove the data and it will need to be imported from a backup export.

Before performing this, verify that the database is not attempting to recover.  To determine if this is occuring, open the application log file.  If it states that it is recovering free space, be patient as it may correct itself.

File Structure

Essbase has a simple file structure that it follows.  It can vary with each application depending on the options used.  The area to focus on for this process is below.  The application and database that is being restored would take the place of appname and dbname.

Hyperion\Products\Essbase\EssbaseServer\App\AppName\DbName

Restoring To A Usable State

In this directory, files with the following extensions will need to be removed.  This will delete all of the data  and temporary settings that are causing the application to function improperly.  It will NOT delete the database outline, calc scripts, load rules, or business rules.

  • .ind (index files)
  • .pag (data files)
  • .esm (Essbase kernel file that manages pointers to data blocks, and contains control information that is used for database recovery)
  • .tct (Essbase database transaction control file that manages all commits of data and follows and maintains all transactions)

After these files are removed, verify that the application and database is functioning.  This can be done in Essbase Administration Services by starting the application.  If the application doesn’t start, more research will have to be performed. If the application loads, import the most recent data backup and run an aggregation.

There are a number of other possible file types in this directory.  Below is some information that may be helpful.

Audit Logs

  • .alg:  Spreadsheet audit historical information
  • .atx:  Spreadsheet audit transaction

Temporary Files

  • .ddm:  Temporary partitioning file
  • .ddn:  Temporary partitioning file
  • .esn:  Temporary Essbase kernel file
  • .esr:  Temporary database root file
  • .inn:  Temporary Essbase index file
  • .otm:  Temporary Essbase outline file
  • .otn:  Temporary Essbase outline file
  • .oto:  Temporary Essbase outline file
  • .pan:  Temporary Essbase database data (page) file
  • .tcu:  Temporary database transaction control file

Objects

  • .csc:  Essbase calculation script
  • .mxl:  MaxL script file (saved in Administration Services)
  • .otl:  Essbase outline file
  • .rep:  Essbase report script
  • .rul:  Essbase rules file
  • .scr:  Essbase ESSCMD script

Other

  • .apb:  Backup of application file
  • .app:  Application file, defining the name and location of the application and other application settings
  • .arc:  Archive file
  • .chg:  Outline synchronization change file
  • .db:  Database file, defining the name, location, and other database settings
  • .dbb:  Backup of database file
  • .ddb:  Partitioning definition file
  • .log:  Server or application log
  • .lro:  LRO file that is linked to a data cell
  • .lst:  Cascade table of contents or list of files to back up
  • .ocl:  Database change log
  • .ocn:  Incremental restructuring file
  • .oco:  Incremental restructuring file
  • .olb:  Backup of outline change log
  • .olg:  Outline change log
  • .sel:  Saved member select file
  • .trg:  Trigger definition file.XML (Extensible Markup Language) format
  • .txt:  Text file, such as a data file to load or a text document to link as a LRO used for database recovery
  • .xcp:  Exception error log
  • .xls:  Microsoft Excel file


SmartView Performance Gains Using Compression

If you have users that rely on SmartView to pull data from your Essbase and/or Planning application, many of them may have large spreadsheets.  One way to improve the perception of the performance of Essbase is the method in which SmartView (client side) communicates with the server.

APS, Planning, and HFM have the ability to take advantage of compression during the communication process.  When large queries, retrieving and submitting data, are initiated, the performance can be significant.

The default compression settings for APS and Planning are not turned on.  The good news is that turning this on is relatively simple.

Find the essbase.properties file on the APS server and change it to false.  The path to this file is different in versions 9 and 11.  In 11, the path is \Products\Essbase\aps\bin.

smartview.webservice.gzip.compression.disable=false

Open the Hyperion Planning application in question and change the SMARTVIEW_COMPRESSION_THRESHOLD in the System Properties (Administration/Manage Properties – System Properties tab) to a value no less than 1.  This threshold is the minimum size of the query in which compression will be used.  So, a value of 1000 would mean compression would be used for anything greater than 1,000 bytes.

For smaller queries, compression may not be necessary.  It may even decrease performance because of the overhead to compress and uncompress the data.  Every environment is different so there is no “right” answer as to what this value should be.

If you have used compression, please share your experiences.


Business Rules That Take More Than Five Minutes to Execute Are Re-launched Repeatedly

There is, what appears to be, a bug in Hyperion Planning that causes business rules that take longer than 5 minutes to re-launch.  The following, published by Oracle, explains the root issue of this problem.  It is not a bug, but a setting in the host web server that causes the request post multiple times.  This explaination from Oracle clearly states that this is ONLY an issue when accessing Hyperion Planning through Hyperion Workspace.  I have seen the same response while accessing Hyperion Planning directly.  Regardless of your entry point, it is a good proctice account for either entry method and should be applied.

This applies to Hyperion Planning, Version: 9.3.1.0.00 to 11.1.1.3.00 and is applicable to all operating systems.

Symptoms

When accessing Planning, Business Rules that normally take more than 5 minutes to complete
run for an unlimited period of time.  By viewing the running Essbase sessions in the EAS console, you can see that the Business Rules “Calculate” sessions are being re-launched every 5 minutes, so that a new instance of the Rule is launched before the first can complete.

This issue only affects Business Rules that normally take more than 5 minutes to complete.

This issue does not affect Business Rules launched directly from Planning (accessing Planning directly on its own URL, bypassing the Workspace).  This issue does not affect Business Rules launched from the EAS console.  This issue only affects systems using Weblogic as a web application server.

Cause

This issue is caused by a default timeout setting of 5 minutes (300 seconds) in the Weblogic HTTP Server Plugin.  This plugin is a set of configuration files in which Weblogic defines how it will interact with the HTTP Server through which Workspace is accessed.  More information on Weblogic Plugins is available here:  http://download.oracle.com/docs/cd/E13222_01/wls/docs92/pdf/plugins.pdf

Solution

Hyperion System 9 and Oracle EPM 11.1.1.x support the use of either Microsoft Internet Information Services (IIS) or Apache as an HTTP server. The steps to increase the timeout depend on which you are using.  The new timeout value should be set to a value larger than the time the longest-running Business Rule takes to execute. The examples below use a setting of 30 minutes (1800 seconds).

Apache HTTP Server

Step 1

Edit %HYPERION_HOME%\common\httpServers\Apache\2.0.52\conf\HYSL-WebLogic.conf

Step 2

Add (or edit, if already present) the following parameters to the two sections for Planning, and also to the two sections for Financial Reporting and Workspace, as the 5 minute timeout issue can cause problems in all three products.Each section begins with an XML tag.

WLIOTimeoutSecs 1800
HungServerRecoverSecs 1800
  <LocationMatch /HyperionPlanning>
<LocationMatch /HyperionPlanning/*>

Add the new “WLIOTimeoutSecs 1800” and “HungServerRecoverSecs 1800” properties as new lines within the tags.  If you are using a version of Weblogic prior to 9.x you need to add the second line “HungServerRecoverSecs 1800” in addition to the “WLIOTimeoutSecs 1800” parameter. This second parameter is not necessary for Weblogic 9.x and later (though it will do no harm).

PathTrim /
KeepAliveEnabled ON
KeepAliveSecs 20
WLIOTimeoutSecs 1800
HungServerRecoverSecs 1800

Internet Information Services (IIS)

Step 1

There are several copies of the iisproxy.ini file. Oracle recommends you modify the files for Planning, Financial Reporting and Workspace, as the 5 minute timeout issue can cause problems in all three products.

Paths (note that “hr” below stands for Financial Reporting):

%HYPERION_HOME%\deployments\WebLogic9\VirtualHost\hr
%HYPERION_HOME%\deployments\WebLogic9\VirtualHost\HyperionPlanning
%HYPERION_HOME%\deployments\WebLogic9\VirtualHost\workspace

Step 2

For each copy of iisproxy.ini, add the following lines at the end of each file.  If you are using a version of Weblogic prior to 9.x you need to add the second line “HungServerRecoverSecs=1800” in addition to the “WLIOTimeoutSecs=1800” parameter. This second parameter is not necessary for Weblogic 9.x and later (though it will do no harm).

WLIOTimeoutSecs=1800
HungServerRecoverSecs=1800

Step 3

Restart IIS from the IIS Manager and restart the Workspace web application service

Oracle HTTP Server is used

Step 1

Modify the file mod_wl_ohs.conf file under the directory, $EPM_ORACLE_INSTANCE\httpConfig\ohs\config\OHS\ohs_component with the following content:

<LocationMatch ^/HyperionPlanning/>
SetHandler weblogic-handler
WeblogicCluster PlaningServer:8300
WLIOTimeoutSecs -1
WLSocketTimeoutSecs 600
</LocationMatch>

Step 2

Restart the Oracle HTTP server and the Workspace web application services after the modifications are complete.


Removing Data From Excel Templates

Working with finance and accounting professional the majority of my career, I see a lot of spreadsheet “templates” that are reused for multiple budget passes or monthly forecasting processes (any repatative process).  When the workbooks have a number of worksheets, and they are large, it can be extremely tedious to clear out the old data and get back to a fresh, empty shell.  The script below can be executed on any worksheet to clear out all the numeric values and cell comments.  It ignores cells with dates, formulas, or text values.

    'loop through each cell in the range of cells used in the worksheet
    For Each c In ActiveSheet.UsedRange.Cells
        'If the cell value is null, don't do anything
        If Not IsNull(c.Value) Then
            'Do not execute on formulas or non numeric values
            If Not c.HasFormula And IsNumeric(c.Value) Then
                'If a cell comment exists and it is not equal
                'to "KEEP", set the value of the cell to null
                If Not (c.Comment Is Nothing) Then
                    If c.Comment.Text <> "KEEP" Then c.Value = Null
                ElseIf c.Comment Is Nothing Then
                    c.Value = Null
                End If
            End If
        End If
        'Execute on all cells in the range where the cell has a comment
        If Not (c.Comment Is Nothing) Then
            'If the comment is equal to "KEEP", don't delete the comment
            If c.Comment.Text <> "KEEP" Then c.Comment.Delete
        End If
    Next c
    MsgBox "Complete"

Breaking It Down

The outside loop will loop through each cell using the ActiveSheet.UsedRange.Cells.  This function will get the range of cells on the worksheet that has been used.  UsedRange will take the equivalent range of using CTRL-HOME to get the upper left cell and CTRL-END to get the bottom right of the range.

For Each c In ActiveSheet.UsedRange.Cells

Next c

Each cell will be checked to verify that the value is not blank, is not a formula, and is numeric (not text).  If this criteria is true, the value will be set to nothing.

If Not IsNull(c.Value) And Not c.HasFormula And IsNumeric(c.Value) Then
c.Value = Null
End If

If the cell has a cell comment, it will be removed as well.

If Not (c.Comment Is Nothing) Then
c.Comment.Delete
End If

In the full example, some additional lines are added to ignore clearing any cell with a cell comment of “KEEP”.

How To Use

To use this script, it must be added to a module.  The easiest way to do this is to create a macro and associate a CTRL-? key to it.

In Excel 2007, select the Developer ribbon and click the Record Macro button.  Immediately click the Stop Recording button.  This will create a function in a new module for you.  If the Developer tab is not visible, click the Office Button and click the Excel Options button.  On the Popular tab, select Show Developer Ribbon.

In Excel 2003, select the Tools / Macro / Record New Macro menu.  Immediately click the Stop Recording button.

After opening Visual Basic in Excel, expand the spreadsheet in the Project window.  Expand the Modules tree and open the module.  Inside the module will be a procedure that is empty.  Paste the script inside the procedure.  This can now be accessed by the CTRL-? that was assigned.

I will be posting more scripts like this.  If you find this helpful, add your email to our mailing list near the top of the right sidebar.  You will get an email any time we add a new article!


Financial Reporting – Bottom 10 KPI

Reporting solutions often require companies to filter out a top range of Key Performance Indicators; for example, the top 10 expenses related to marketing. Hyperion Financial Reporting makes this type of reporting easy for developers by providing the “Top” properties checkbox. The difficulty arises when a company requires a solution to display the bottom 10 – those 10 expenses that account for a majority of marketing related expense. Hyperion Financial Reporting has nothing built to provide this type of information.

As you might expect – knowing your smaller expenses is important but knowing the largest; those where you can improve margin, is vital. A solution to display the bottom 10 is detailed below; this solution displays the 10 largest negative values vs. displaying the 10 largest positive values.

The high-level solution includes the following functionality:
a.    Inserting a “Rank” column.
b.    Sorting on the “Rank” column.
c.    Adding conditional suppression for bottom 10.

Step 1:

Create a report grid with a formula column as the first column (Column A below).


Step 2:

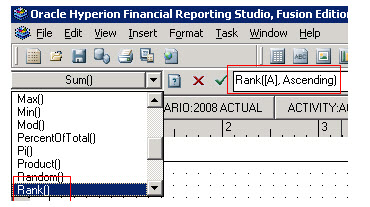
Insert the “Rank” function on the Formula Column. Be sure to choose the “Ascending” property. Adding “Rank” will order the rows from High-to-Low based on the data returned. The example below provides ranking off of Column ‘A’. The ranking is used on Step 4 when adding conditional suppression.

Step 3:

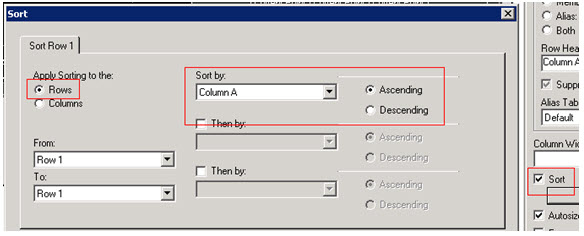
Apply row “Sort” to the grid. You find the “Sort” property by placing focus on the entire grid (left clicking the upper left-most cell). Choose to apply sorting to the “Rows”, Sort by “Column A”, and sort in “Ascending” order. Sorting will determine the order in which the data is displayed, Ascending or Descending. The Sorting is used on Step 4 when adding conditional suppression.

Step 4:

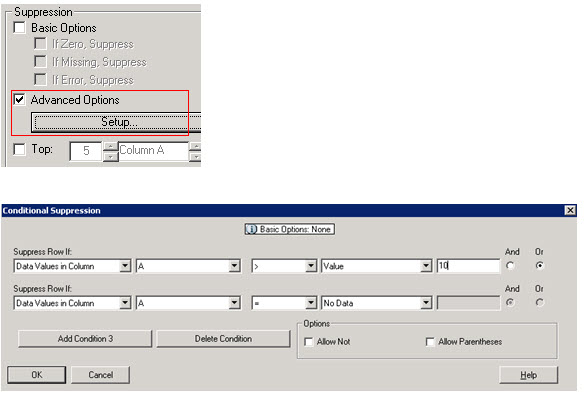
Add Conditional Suppression to the row(s). This logic will determine which data rows are ultimately displayed to the user. To add conditional suppression, highlight the row and click “Advanced Options”. Because the requirement is to show the bottom 10, suppression should hide any row with a “Rank” value greater than 10 (You will also want to suppress rows where “No Data” is returned).

When this report is run, only the bottom 10 will be displayed to the user… those marketing expenses with the largest negative values. The solution above will essentially do what a “Bottom” checkbox would have provided had Hyperion programmed this functionality into the application.