1

Oracle EPBCS/PBCS May Updates – Big Changes!

I don’t normally write up monthly updated, but this month there are a number of intriguing changes/updates/enhancements that are important to know.  Some may change existing processes.  This is not an exhaustive list, but these are things I think all of us should take note of.

The changes that you will see in the UI may not be visible unless you clear your cache.

EPMAutomate

  • You MAC users are going to like this, it can now be installed and work on a MAC. By the way, I am one of them.  I can’t wait until the beta is finished for the Smart View to work with office360, meaning MAC, Ipad, etc.
  • You can now run multiple instances of EPMAutomate. So, logging out of one will not log you out of the other.  This will help those that want to run test and prod on one VM.  It will also remove any issue of one process stepping on another.
  • Admin mode can be enabled with EPMAutomate, which was a huge missing piece, in my opinion.
  • A sortMember command to order members in dimensions is now available.

Forms

  • No more composite forms, sorry guys!

Smart Push

  • There is a new Smart Push option called Use Database Suppression that enables you to apply row suppression at the database level instead of at the application level, thus eliminating the impact on query thresholds and improving Smart Push wait times.

Settings

  • There is a new setting to set the accounts that are linked between plan types to false. This will use the  a new attribute of HSP_LINK (not HSP_NOLINK).

Groovy

  • We now have the ability to use the new suppression option on the data map / smart push. This will improve performance and reduce the need to break up pushes in groups of members.
  • Groovy can now run jobs. This means a rule can execute other jobs within that rule.  They show as tasks in the job console.  This is limited to the execution of rules, rulesets, and templates.
  • All RTPs are now supported in ASO.

Smart View (AMEN on some of these as us old timers will love) – You will want to download the updated version to take advantage of these.

  • In-grid, cell-based POV—POV members are placed on the grid instead of in the POV toolbar.
  • Submit without refresh—Using the default Submit Data button in the Smart View ribbon, all data cells in a single grid (modified cells and unchanged cells) are marked dirty and submitted. Once the submit operation is complete, the entire grid will be refreshed.
  • Enhanced free-form—Users can insert empty columns and rows anywhere in a grid and change the alias table. Additionally, supports member auto-refresh where deleted members are returned to the grid upon refresh.
  • Multiple-grid ad hoc—Multiple ad hoc grids can be placed on the same Excel worksheet. With multiple-grid ad hoc, users can submit data from any grid on the sheet. Grids based on aggregate storage cubes and block storage cubes are supported on the same sheet. Each grid is independent; for example, if required, you can change the alias table for only one grid on the sheet.
  • Users will now get a warning when the version installed is out of date. Hopefully this can be turned off!

General

  • Jobs can now have a new return, success with warnings. An example of this might be loading data.  The job finished successfully but there were rejected records.  Make sure your automation accounts for this!

DM

  • There is now an option to not run the validation when data is loaded. For those of you that despise the performance challenges of using DM, this might be a game changer.  The longest part of the process is the actual validation, not the import or export to Planning.

Modules in ePBCS

  • Rolling forecast can now be configured for length.
  • There were some critical bugs that were fixed in WFP (I know first-hand).
  • Some CapX forms were improved as well.


Change The Spread Method In An Existing PBCS Application

Changing application settings was always a little bit of a pain with an on-premise Planning application.  It was a time intensive task of recreating the application, artifact groups at a time.  If you were a little bit of a risk taker, you might have figured out that there were fields in the relational repository that could be updated.  Is there an easy way to do this with PBCS?  Since the repository is not accessible in the cloud, legacy methods are not available.  That said, I think it is easier and seemingly less risky with a PBCS application.

How To Perform Configuration Changes

The basic steps are very simple.  If migrations are new to you, take caution and make sure the application backup is readily available.  Always try this in the test environment first.

  1. Run a migration backup by going to the navigation menu and selecting Migration under the Tools header and clicking the Backup button.
  2. Download the backup by changing the view to Snapshots and selecting the ellipse to the right of the created migration and select download.
  3. Unzip the downloaded file to a new folder.
  4. Edit the appropriate file / change the settings (see below).
  5. Zip the files previously unzipped to a new zip file.  Make sure the parent folder is not included.  The folder and files unzipped should be the root of the new zip file.
  6. Upload to zip file created above by going back to Migration under the Tools header in PBCS.  Change the view to Snapshots and click the upload button.  If the backup is too large, you may need to use EPM Automate.
  7. Delete the existing application by moving to the Overview area which can be found in the navigation menu under the Application header, select the Action button and click Remove Application.
  8. After the application is deleted, log back in to PBCS and choose the Migration option in the navigation menu.  Create a new application with the updated zip file by clicking the ellipse and choosing Import.

Updating The Configuration

Before proceeding, I have tried this by only migrating the configuration (not recreating the application) and it didn’t work.  The application had to be recreated so the entire backup was required.  So, although only one file is updated, it is still important to take a full backup.

The migration files hold everything you need to update pieces and parts of an application.  In this situation, the focus will be on the configuration options, specifically the spread method.  Since this is needed to create an application, the spread method is often not decided on and may need to be changed later.  To change it after the fact is pretty easy.  Navigate to and open the Application Definition.xpad file.  This is inside the HP-xxx folder.  The xxx represents the name of the application.  This is a text file so it can be opened in any text editor.  If notepad is used, the line feeds won’t be visible and all the lines will be smashed together.  Notepad++ is a recommended alternative.  See below for the full path of the xpad file.

The Application Definition.xpad file, when opened, should look similar to the following.  This is not a full representation of the file so expect it to be larger when opened.

Scroll down a short way and find the WeeksDistribution property.  It will likely have a 445 pattern or will read Even.  Change this option to the preferred method and save the file.  The options are 445, 454, 544, and Even.

There are, as you see, other options that can changed.  Although I have only changed the spread method, I am moderately confident that the others, if changed here, would be reflected when the zip file is imported.

 <Calendar>
  <BaseTimePeriod>12 Months</BaseTimePeriod>
  <WeeksDistribution>Even</WeeksDistribution>
  <AppStartYear>2015</AppStartYear>
  <FiscalYearStartDate>SameCalendarYear</FiscalYearStartDate>
  <StartMonth>Jan</StartMonth>
  <NumberOfYear>15</NumberOfYear>
  <AllYearsParent>Y</AllYearsParent>
</Calendar>

Note that some of these are not options when the application is created, like whether the application has a parent for years.  I have not tinkered with this for that reason, but it is there if you want try.

Importing A File Too Large For The UI

As stated above, large files cannot be loaded through the PBCS UI.  I have run into this before and believe the maximum size of the file that can be uploaded is less than 2GB.  EPM Automate has an upload file command that overcomes this.

epmautomate login username userpassword https://planning-domain.pbcs.datacenter.oraclecloud.com domain
epmautomate uploadfile "[path]\[filename].zip"

example:  
epmautomate login kgoodfriend GoJackets https://planning-A123345.pbcs.us6.oraclecloud.com A12345
epmautomate uploadfile "c:\backups\PBCS_In2Hyperion.zip"

Finishing Up

There are a lot of useful things you can do with the migration files.  Making changes is sometimes easier in bulk than one artifact at a time.  Many free tools are available to find and replace text in multiple files, and even use patterns.  Some changes require a bit of hunt and peck if they are common and may occur in more places than you want to change.  If you have an application name that is similar to a database name it gets a little more tedious.  Obviously replacing a database name called plan would likely be more work because plan exists in many places, not just a database name.  Here are some thoughts and uses.

  • Changing the application name
  • Changing database names
  • Updating member names in all forms and rules
  • Finding forms and rules that use members to be removed


Recommended Settings for Oracle Hyperion Products

Problem

Oracle has recommended settings for Internet Explorer (IE7, IE8, IE9, IE10 and IE11) when using Hyperion products.  I get this question a lot from my clients, so I thought I would share Oracles suggested settings.  Without changing these, there will be intermittent problems, and frustration points.

Solution

Configure browser to check for new version every time user visits a page

  • Open Internet Explorer
  • Go to Tools > Internet options > General
  • In “Browsing history” section click on “Settings” button and then select “Every time I visit the webpage” option
  • Click OK, then Apply.

Disable default pop-up blocking

  • Open Internet Explorer
  • Go to Tools > Internet options > Privacy tab
  • Uncheck “Turn on Pop-up Blocker”

Add Workspace URL to trusted sites

  • Open Internet Explorer
  • Go to Tools > Internet options > Security tab
  • Select “Trusted sites” from “Select a zone to view or change security settings” window, then click on “Sites” button.
  • Type your workspace URL in form http://workspaceserver:portnumber in “Add this website to the zone”
  • Uncheck “Require server verification (https:) for all sites in this zone”
  • Click Add, then Close.
  • Click OK and Apply.

Customize security settings

  • Open Internet Explorer
  • Go to Tools > Internet options > Security tab
  • Select “Trusted sites” from “Select a zone to view or change security settings” window
  • Select zone containing your Oracle Hyperion servers and click on “Custom level…” button
  • In “Miscellaneous” section enable options “Access data sources across domains” and “Allow script-initiated windows without size or position constraints”
  • In “ActiveX controls and plug-ins” section enable “Run ActiveX controls and plug-ins” and “Script ActiveX controls marked safe for scripting”.
  • Click OK
  • Click Apply, then OK

Enable option “Always allow session cookies”.

  • Open Internet Explorer
  • Go to Tools > Internet options > Privacy Tab > Advanced. Check the “Override automatic cookie handling”, accept the first and third party cookies and check the “Always allow session cookies” option.

Only for SSL enabled environments: Disable option “Do not save Encrypted Pages to Disk”.

  • Open Internet Explorer
  • Go to Tools > Internet options > Advanced Tab. In “Security” section uncheck the option “Do not save Encrypted Pages to Disk”.

Disable option “Enable Native XMLHTTP”. This setting is recommended only for customers using HFM 9.3.1 or older with IE 7. If you are using version 11.1.1.x of EPM products or newer, this option should be enabled.

  • Open Internet Explorer
  • Go to Tools > Internet options > Advanced Tab. In “Security” section uncheck the option “Enable Native XMLHTTP”.

Using Internet Explorer 9 Compatibility View option.

  • Open Internet Explorer
  • For 11.1.2.1.600 Planning and EPMA: Compatibility View should be enabled in Tools > Compatibility View Settings
  • For EPM 11.1.2.2 products: Go to Tools > Compatibility View Settings. Make sure EPM Workspace URL is not enabled for Compatibility View and uncheck all available options at the bottom of the pop-up window.

For products using JRE Plugin (Web Analysis, Performance Scorecard, Administration Services) make sure that a compatible version of plugin is installed on the client machine.

  • Check JRE Plugin certification for your EPM product in support matrix
  • Check installed Java version in Control Panel > Java > General > About. If required update Java version to a supported release.
  • Enable option “Always Auto-Download” in Control Panel > Java > Advanced > JRE Auto-Download=

Using Internet Explorer 11 Enterprise Mode. Limited support with EPM 11.1.2.2.500 and 11.1.2.3.500. For more information see Document 1920566.1.


Creating a SmartList: Linking Smartlists to Web Forms

What is a Smart List?
  • Allows for creation of custom lists that can be used in data forms
  • Goes beyond the limitations of Essbase: these lists are not limited to numbers only
  • Users select a member from a designated list (each Smart List cell has a dropdown arrow that expands to allow member selection in web forms)

Examples…

  • Active Period: Manage Forecast/Budget months by setting them to either “Active” or “Inactive”
  • Employee Status: Set employee status to “Full Time” or “Part Time”
  • Justification: Choose from “Research”, “Customer Feedback”, or “Expansion”

Creating a Smart List

First, create a new dimension (File-> New-> Dimension) with SmartList as the dimension type:

Next, create children of ActivePeriod. These will be the members of the Smart List (Right click on ActivePeriod, Create Member-> As Child):

Set the properties for each of the Smart List’s members. The label will be what appears in the dropdown menu, while the value is the number that will be assigned to that member in Essbase. The list will be sorted from smallest to largest. Here are the properties for Inactive:

And the properties for Active:

The way this Smart List is currently set up, Inactive will appear above Active because 0 precedes 1.

Set the properties for the Smart List:

Here is a description of each of the Smart List Dimension Properties referenced from Oracle’s knowledge base:

Property

Description

Label

Enter the text to display when the Smart List is selected. Smart Lists and Smart List members must have a Label assigned. Spaces and special characters are allowed.

Auto Generate ID

Generate a numeric ID for each Smart List entry. If you do not select this option, you can customize Smart List ID values.

Start Value

Populates the Value property of the first member in the Smart List. For example, if the Smart List dimension is ActivePeriod with Start Value set to 0, the first member added to this list has a value of 0.

Increment

This value is appended to the value of the last member in the list to determine the value for the selected member. For example:

ActivePeriod (Start Value=0, Increment=1)

Inactive (Value=0)

Active (Value=1)

Display Order

Smart Lists can be sorted in the dropdown menu by 1 of 3 ways:

ID: Unique number that sets the order for the Smart List entry

Name: Unique name containing only letters/numbers & underscores. (i.e. “Active”). No special characters or spaces.

Label: Displayed text for the Smart List entry in the dropdown

#Missing Data Form Label

How #Missing values are displayed in Smart List cells:

Dropdown: Displays the label set in #Missing Drop Down Label

Grid: This selection determines what the cell will display on a form when the cell is not highlighted/selected

#Missing Drop Down Label

Enter a label to be displayed as an entry in the Smart List whose value is #Missing


Linking a Smart List to a Web Form

Create and/or use an already existing member in a dimension that is being used in the application to be associated with the Smart List. In this example the account associated with the Smart List is called “Active Period”. Notice that this member has a space in the middle, unlike our Smart List dimension “ActivePeriod”, which is all one word:

Set the properties for “Active Period” so that the Smart List property is tagged to ActivePeriod and the Data Type is SmartList:

The most critical step before deploying the application is to set the Data Type Evaluation Order for the Planning application. In order for Smart Lists to appear on web forms, the dimension that the Smart List is associated with (in this case the Account dimension) must be included in the evaluation order. From the local library, right-click on the application:

Move the account dimension over to the selected dimensions pane for the selected plan type:

Deploy the application for the changes to take effect so that the Smart List can be utilized in a web form.

Next, select the form that will be using the Smar tList. Edit it and go to the Layout tab. For this example, “Active Period” is placed as the lone member of the account dimension in the rows:

Save the form and open it to check that the Smart List is working properly. The list is functioning correctly if a dropdown arrow appears in the highlighted cell:

Click the dropdown to make a selection:

The Smart List has been successfully created and linked to a Planning web form. This feature offers great functionality for users that require text data, as this is not available through Essbase alone. Smart Lists can also be utilized in member formulas and business rules.

For more detailed technical information on Smart Lists, here is a link to the Oracle documentation:

http://docs.oracle.com/cd/E1282501/epm.111/epmarchitect/frameset.htm?ch04s16.html


Update for ASO (1/12/2015):


Recently, I was attempting to create Smart List functionality in an ASO cube. My only previous experience had been with BSO cubes, so I was not prepared for the couple of key differences that came up that hindered my progress. Here are the steps I took to successfully create a Smart List associated with an ASO cube. First, create a Smart List dimension by right clicking on the application in the dimension library:

For this example, I’ve named the Smart List “ClientSource”:

The Smart List has one member in it, “PV”:

And the Smart List will be associated with the account member, “ClientSource”:

In the account dimension, select the member that will have the Smart List associated with it (“ClientSource”),  and update the following 2 highlighted settings. This is the first part of the process that differs from that outlined above. In BSO, the settings are labeled “Data Type” & “Smart List”, rather than “Type” & “Smart List”:

After saving, I figured that the Smart List was good to go, but on deployment, I received the following error:

After some trial & error, the issue turned out to be coming from the data storage settings on the parents of “ClientSource”. After setting both parents (“AttributeInfo” & “Accounts”) to “LabelOnly”, the application deployed successfully.

To recap, there are 2 key differences between ASO & BSO cubes when setting up Smart Lists:

  1. For BSO, the user must set “Data Type” to “SmartList” for the associated member. While in ASO, the user must set “Type” to “SmartList”
  2. Before deploying the ASO application, the parent members of the member that is associated with the Smart List must be set to “LabelOnly”

I hope that this can help a few of you from having to spend time troubleshooting the difference between Smart Lists in ASO & BSO.


SmartView Performance Gains Using Compression

If you have users that rely on SmartView to pull data from your Essbase and/or Planning application, many of them may have large spreadsheets.  One way to improve the perception of the performance of Essbase is the method in which SmartView (client side) communicates with the server.

APS, Planning, and HFM have the ability to take advantage of compression during the communication process.  When large queries, retrieving and submitting data, are initiated, the performance can be significant.

The default compression settings for APS and Planning are not turned on.  The good news is that turning this on is relatively simple.

Find the essbase.properties file on the APS server and change it to false.  The path to this file is different in versions 9 and 11.  In 11, the path is \Products\Essbase\aps\bin.

smartview.webservice.gzip.compression.disable=false

Open the Hyperion Planning application in question and change the SMARTVIEW_COMPRESSION_THRESHOLD in the System Properties (Administration/Manage Properties – System Properties tab) to a value no less than 1.  This threshold is the minimum size of the query in which compression will be used.  So, a value of 1000 would mean compression would be used for anything greater than 1,000 bytes.

For smaller queries, compression may not be necessary.  It may even decrease performance because of the overhead to compress and uncompress the data.  Every environment is different so there is no “right” answer as to what this value should be.

If you have used compression, please share your experiences.


Business Rules That Take More Than Five Minutes to Execute Are Re-launched Repeatedly

There is, what appears to be, a bug in Hyperion Planning that causes business rules that take longer than 5 minutes to re-launch.  The following, published by Oracle, explains the root issue of this problem.  It is not a bug, but a setting in the host web server that causes the request post multiple times.  This explaination from Oracle clearly states that this is ONLY an issue when accessing Hyperion Planning through Hyperion Workspace.  I have seen the same response while accessing Hyperion Planning directly.  Regardless of your entry point, it is a good proctice account for either entry method and should be applied.

This applies to Hyperion Planning, Version: 9.3.1.0.00 to 11.1.1.3.00 and is applicable to all operating systems.

Symptoms

When accessing Planning, Business Rules that normally take more than 5 minutes to complete
run for an unlimited period of time.  By viewing the running Essbase sessions in the EAS console, you can see that the Business Rules “Calculate” sessions are being re-launched every 5 minutes, so that a new instance of the Rule is launched before the first can complete.

This issue only affects Business Rules that normally take more than 5 minutes to complete.

This issue does not affect Business Rules launched directly from Planning (accessing Planning directly on its own URL, bypassing the Workspace).  This issue does not affect Business Rules launched from the EAS console.  This issue only affects systems using Weblogic as a web application server.

Cause

This issue is caused by a default timeout setting of 5 minutes (300 seconds) in the Weblogic HTTP Server Plugin.  This plugin is a set of configuration files in which Weblogic defines how it will interact with the HTTP Server through which Workspace is accessed.  More information on Weblogic Plugins is available here:  http://download.oracle.com/docs/cd/E13222_01/wls/docs92/pdf/plugins.pdf

Solution

Hyperion System 9 and Oracle EPM 11.1.1.x support the use of either Microsoft Internet Information Services (IIS) or Apache as an HTTP server. The steps to increase the timeout depend on which you are using.  The new timeout value should be set to a value larger than the time the longest-running Business Rule takes to execute. The examples below use a setting of 30 minutes (1800 seconds).

Apache HTTP Server

Step 1

Edit %HYPERION_HOME%\common\httpServers\Apache\2.0.52\conf\HYSL-WebLogic.conf

Step 2

Add (or edit, if already present) the following parameters to the two sections for Planning, and also to the two sections for Financial Reporting and Workspace, as the 5 minute timeout issue can cause problems in all three products.Each section begins with an XML tag.

WLIOTimeoutSecs 1800
HungServerRecoverSecs 1800
  <LocationMatch /HyperionPlanning>
<LocationMatch /HyperionPlanning/*>

Add the new “WLIOTimeoutSecs 1800” and “HungServerRecoverSecs 1800” properties as new lines within the tags.  If you are using a version of Weblogic prior to 9.x you need to add the second line “HungServerRecoverSecs 1800” in addition to the “WLIOTimeoutSecs 1800” parameter. This second parameter is not necessary for Weblogic 9.x and later (though it will do no harm).

PathTrim /
KeepAliveEnabled ON
KeepAliveSecs 20
WLIOTimeoutSecs 1800
HungServerRecoverSecs 1800

Internet Information Services (IIS)

Step 1

There are several copies of the iisproxy.ini file. Oracle recommends you modify the files for Planning, Financial Reporting and Workspace, as the 5 minute timeout issue can cause problems in all three products.

Paths (note that “hr” below stands for Financial Reporting):

%HYPERION_HOME%\deployments\WebLogic9\VirtualHost\hr
%HYPERION_HOME%\deployments\WebLogic9\VirtualHost\HyperionPlanning
%HYPERION_HOME%\deployments\WebLogic9\VirtualHost\workspace

Step 2

For each copy of iisproxy.ini, add the following lines at the end of each file.  If you are using a version of Weblogic prior to 9.x you need to add the second line “HungServerRecoverSecs=1800” in addition to the “WLIOTimeoutSecs=1800” parameter. This second parameter is not necessary for Weblogic 9.x and later (though it will do no harm).

WLIOTimeoutSecs=1800
HungServerRecoverSecs=1800

Step 3

Restart IIS from the IIS Manager and restart the Workspace web application service

Oracle HTTP Server is used

Step 1

Modify the file mod_wl_ohs.conf file under the directory, $EPM_ORACLE_INSTANCE\httpConfig\ohs\config\OHS\ohs_component with the following content:

<LocationMatch ^/HyperionPlanning/>
SetHandler weblogic-handler
WeblogicCluster PlaningServer:8300
WLIOTimeoutSecs -1
WLSocketTimeoutSecs 600
</LocationMatch>

Step 2

Restart the Oracle HTTP server and the Workspace web application services after the modifications are complete.


Why Does Workspace Log You Out?

Many clients have issues with Workspace logging users out when attempting to open/export certain types of documents. For example, a user logged into Hyperion Workspace attempts to open a Supporting Detail document, only to be prompted with a logout warning message before the document opens. The same can happen when a user attempts to export an FR report file (.DES file) from Workspace. After being logged out of Workspace, the user is able to log back into the application and open/export the necessary document. This issue can easily fixed by adjusting a few browser settings as shown below.

NOTE: Microsoft documents typically cause this logout issue (Excel, Word, PowerPoint).

1. Open your web browser (This blog entry will assume IE).

2. Select “Tools” -> “Internet Options…” from the menu bar.

3. Select the “Internet” option inside the “Security” tab. Select “Custom Level…”.

4. Navigate to the “Downloads” section and “Enable” Automatic prompting for file downloads. Click “OK”.


5. Now select the “Local Internet” option inside the “Security” tab. Select “Custom Level…”.


6. Navigate to the “Downloads” section and “Enable” Automatic prompting for file downloads. Click “OK”.


7. Finally, select the “Trusted sites” option inside the “Security” tab. Select “Custom Level…”.


8. Navigate to the “Downloads” section and “Enable” Automatic prompting for file downloads. Click “OK”.

9. Now that the settings have been set properly, Click “OK” on the “Internet Options” dialog box.

10. Close and re-open your web browser for the settings to take effect. Test these settings by logging into Workspace and opening a Supporting Detail document.


Why is the maximum number of returnable rows in SmartView only 5,000?

Regardless of whether the perception of using SmartView for large queries is good or bad, the reality is that finance and accounting users require the ability to pull large volumes of information out of Essbase.  The only limit that I am aware of in the days of the Excel Add-In was the maximum number of rows Excel would allow (assuming the Essbase application cache settings were high enough to support it).  With SmartView, there is a limit.  The limit is controllable very easily, however.  The error that users may question an administrator follows.

“Cannot perform cube view operation. OLAP error (1020011): Maximum number of rows [5000] exceeded.”

To increase the maximum number of rows a user can retrieve, or submit, edit the service.olap.dataQuery.grid.maxRows property in the essbase.properties file.  The default is 5000. While editing this property, it may be benefitial to evaluate the size if the columns (.olap.dataQuery.grid.maxColumns), which is set to 255 by default.

Once this is updated, restart the Hyperion services.

The location of the essbase.properties file is dependent on the version of Essbase installed.  Start by going to the server with APS installed.

Location for version 9.3
%HYPERION_HOME%\AnalyticProviderServices\bin directory

Location for version 11
%HYPERION_HOME%\products\Essbase\aps\bin\


Adding Font Types in Financial Reporting

The ability to import font types into Hyperion Financial Reporting is a common request by many companies, typically a request resulting from corporate reporting standards. Not only is this possible, it’s a quick and easy exercise that is detailed out below.

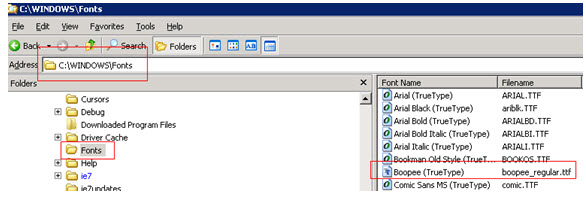
Step 1: Locate the Font Folder.

The font type files (normally identified by a .TTF or .ttf extension) can be found in the “Fonts” folder located in your Windows directory (Likely on your ‘C’ drive). The key here is locating this folder on the server where Hyperion Financial Reporting has been installed.

Step 2: Copying& Pasting the New Font File.

This is as easy as it sounds… just copy and paste the new file into this directory.

Step 3: Creating a Report.

Opening Hyperion Financial Reporting and create/modify a report. When selecting the font type, notice the new Font Type that was just added in Step 2 above. Note that it’s best to close the Financial Reporting client before importing the new Font file onto the server; this will insure that the client will recognize the new file.


Sparse, Dense, and Blocks For Dummies

When I am introduced to business segments that use Hyperion Essbase, I always get asked the same question: “Can you explain what sparse and dense mean?”  Although I agree that users don’t HAVE to understand the concept, I contend that it is extremely valuable if they do.  It will not only help them become more efficient users, it goes a long way in helping them understand why something simple in Excel isn’t always simple in Essbase.  If users understand what a block is, and what it represents, they have a much better experience with Essbase.

If you are a relational database developer or a spreadsheet user, you tend to view data in 2 dimensions.  An X and Y axis is equivalent to the rows and columns in your spreadsheet or database table.  Essbase is a little different in that it stores data in 3 dimensions, like a Rubik’s Cube, so it has a Z axis.  Essbase databases refer to these “Rubik’s Cubes” as blocks.  An Essbase database isn’t one giant Rubik’s Cube; it could be millions of them.  The size and number of possible blocks a database has is determined by the sparse/dense configuration of the database.

An Essbase outline has a number of dimensions.  The number of dimensions can range in quantity and size, but each dimension is identified as a dense or sparse dimension.  The dense dimensions define how large each block will be in size (the number of rows, columns and the depth of the Z axis).  The sparse dimensions define the number of possible blocks the database may hold.  Assume the following scenario:  a database exists with 3 dense dimensions and 2 sparse dimensions.  The dense dimensions are as follows:

Net Income
Income
Expenses

Qtr 1
Jan
Feb
Mar

Version
~ Actual
~ Budget
~ Forecast

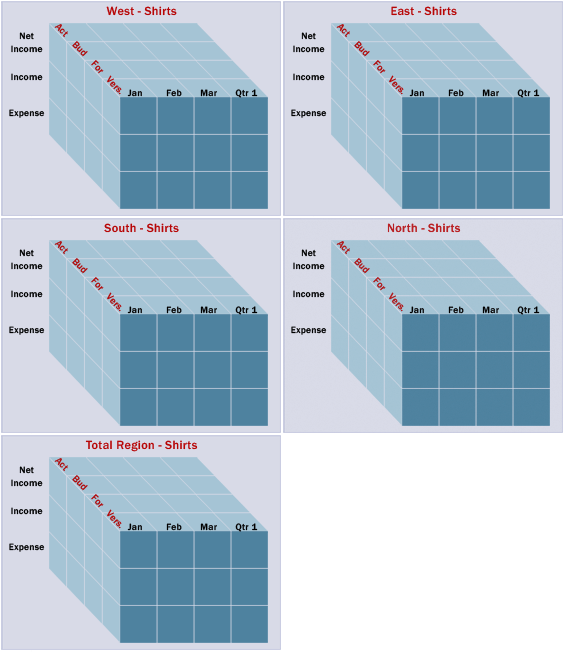
Remember, the dense dimensions define the size of blocks.  These dimensions would produce a block that looks like the image below.  Every block in the database would be the same.

For those more knowledgeable with Essbase design, this example assumes that no member is dynamically calculated or is tagged as a label to reduce complexity.


The sparse dimensions are below.

Total Product
Shirts
Pants

Total Region
North
South
East
West

The unique combinations of each sparse dimension has its own block.  There will be a block for Pants – North, one for Shirts – North, and so on.  Since there are 3 members in the Total Products dimension and 5 members in the Total Region dimension, there will be a total of 15 (3 x 5) blocks.  If a database has 5 sparse dimensions, all with 10 members, it would have a total possible number of blocks equal to 100,000 (10 x 10 x 10 x 10 x 10).  Below is a representation of the possible blocks for Shirts.