1

Debunk The Myth: Never Fix On Dense Members

The generic rule in Essbase is that calculations FIX on sparse members because sparse members are what define the number of blocks.  When you want to limit the members of the block on which the calculation is executed, an IF statement is appropriate.

Quick Overview of Dense and Sparse

If you are unfamiliar with the concept of dense and sparse, here is a quick overview.  A data block in Essbase is constructed from the dense dimensions of the database.  The number of members in each dense dimension impacts the size of each data block.  The combination of a member in each sparse dimension is what defines a block.  The number of members in the sparse dimensions directly correlates to the number of blocks that may exist.

For a more detailed overview, reference Sparse, Dense, and Blocks For Dummies.

Comparison To Relational Database

A FIX is a lot like a SELECT statement in a relational database using a WHERE clause.  The WHERE clause limits the number of records, an Essbase FIX limits the number of blocks for which an action is taken.  An IF statement in Essbase is similar to a CASE statement in a relational database in that it executes on all the records and acts only when a criteria is met.

Limiting the records

Relational Example

UPDATE table_name
SET Salary=Annual Salary * Merit Increase
WHERE Year=2013;

Essbase Example

FIX(“2013”)
  Salary = “Annual Salary” * “Merit Increase”;
ENDFIX

Executing on all records when they meet criteria

Relational Example

SELECT 
   CASE 
      WHEN Year = 2013 THEN Salary = Annual Salary * Merit Increase 
      ELSE Salary = Salary 
   END 
FROM table_name

Essbase Example

IF(@ISMBR(“2013”))
  Salary = “Annual Salary” * “Merit Increase”;
ENDFIX

When running an UPDATE query, limiting the number of records is more efficient than running the query on all the records and checking for specific criteria to execute the logic.

Why Fix On Dense?

The reason we are taught to FIX on sparse dimensions and use IF on dense dimensions is that a FIX will improve performance by limiting the number of blocks on which the calculation executes.  There is no reason to FIX on dense dimensions because it isn’t limiting the number of blocks on which the calc is executed.

Forget all that!

Calculations still run for every intersection, not JUST the intersection of sparse members.  Assume a calculation fixes on one intersection of sparse members.  Also assume that there are 20 measures and 12 periods that are stored, and both dimensions are dense.  The following calculation

Salary = Annual_Salary * Merit_Increase;

would run on every dense combination, so it would execute 240 times (12 x 20).  You can easily prove this by incrementing the value of one dense member by 1.

Salary = Salary   1;

If Salary starts as #Missing, or 0, and the above line is executed, Salary will be 20 for each month.

Solution

This can easily be resolved.  Since you only want the calculation to execute one time on the block, add one member from the measures dimension to your fix statement.  This member doesn’t have to be the member you are calculating.  I typically will fix on a generic measure to eliminate confusion.  Change the calculation to the following.

FIX(No_Measure)
  Salary = Salary   1;
ENDFIX

Make sure Salary is set to #Missing or 0, and execute the new calculation.  When the new calculation script is executed, you should see a value of 1 for every month.

In a situation where Salary = Annual_Salary * Merit_Increase, the result will be correct regardless of whether the calculation fixes on one measure, but the performance will be far worse when executed on every Measure because it will run the same calculation multiple times.

Summarize The Essbase Data Error File

How many times have you been in a situation where you have to traverse through hundreds of lines and errors from an Essbase data load only to figure out that all the rejected records are caused by an issue with one member?  You load the file again and wham – another error file with issues you didn’t see the first time.

Although this is typically less of an issue in a production environment, these situations are very likely in the development and testing phases of a project.

In2Hyperion is introducing another free tool that will navigate through errors and summarize the reasons for the rejects.  If 1,000 errors occurred because of one member, the feedback provided will show one line.

Hopefully our community will be able to use this utility to save themselves time and frustration.  It’s a free download!  For more information about the license, requirements, and installation, read Show Unique Essbase Error utility page.


ZipLogs Utility

OK, I have opened up a ticket with Oracle.  Now, they want my logs.  Frustration sets in, and I wonder…how long is it going to take to figure out where they all are and which ones are important?  If I miss one, my resolution will surely get delayed. This is all I need!

In newer versions of the Hyperion environment, Oracle has made some huge improvements.

First, the logs are much more centralized.

  • The installation logs are now located in EPM_ORACLE_HOME/diagnostics/logs.
  • The configuration, service startup, and runtime logs for all the service components are in EPM_ORACLE_INSTANCE/diagnostics/logs.
  • The web application runtime logs are in MIDDLEWARE_HOME/user_projects/domains/domain name/servers/managed server name/logs.

Second, they have a batch, or shell script depending on the environment, that will zip all the needed logs into one file so you can easily provide all the detail for Oracle to be as efficient as possible in diagnosing my problem.

In the EPM_ORACLE_INSTANCE/bin folder, the ziplogs.bat (ziplogs.sh) script will create a zip file with all the logs for me, and place the zip in EPM_ORACLE_INSTANCE/diagnostics/ziplogs.

Now, there is one file per server with the appropriate collection of logs, configuration files, and other pertinent info that the help desk can use.


My Grid Rows Aren’t Aligned To My Data Rows

No, your eyes aren’t playing tricks on you. The grid lines don’t align with the row headers. It is very slight on smaller forms, but forms with hundreds of rows compounds the issue. The further down the grid, the more of an issue the offset is.

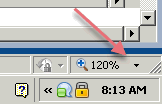
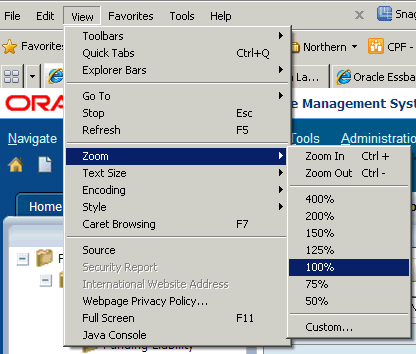
If you have ever seen this issue and pulled your hair out trying to figure out why it happens with some users and not others, fixing it is embarrassingly (now that I know) easy. Change the zoom in IE back to 100%!

Take a look at the bottom right area of IE.  If you see that the zoom is NOT 100%, select the View / Zoom / 100% menu.

Hopefully this will save you some time if you ever run accross this issue.


Change Application Maintenance Mode via Command Line

Patch Set Update: 11.1.2.1.600 offers a welcome utility

If you have ever tried to automate the state of a Hyperion Planning applications’ Application Maintenance Mode, you found it difficult. The only way to accomplish this was to run a SQL Update on the repository table, and for this to take effect, the Planning service had to be restarted.

If you are unfamiliar with the Application Maintenance Mode setting, it is found in Administration/Application/Settings menu. Changing this setting from All Users to Administrators, locks out planners from using the application. It is typically used when changes are made to hierarchies, web forms, system settings, security, and during deploys, to keep users out while changes are being introduced.

Patch Set 11.1.2.1.600, and the corresponding patch release for 11.1.2.2, introduces a new utility that allows administrators to change this setting from a command line. YEAH, it can now be automated without restarting Planning!

Without Further Adieu

MaintenanceMode.cmd (or MaintenanceMode.sh in UNIX) is found in the <EPM_PLANNING_INSTANCE> directory. The following parameters can be passed, separated by commas.

  • /A=app – Application name (required)
  • /U=user – Name of the administrator executing the utility (required)
  • /P=password – The administrator’s password (required)
  • /LL=loginLevel – [ALL_USERS|ADMINISTRATORS|OWNER]

ALL_USERS – All users can log on or continue working with the application.

ADMINISTRATORS – Only other administrators can log on. Other users are forced off and prevented from logging on until the parameter is reset to ALL_USERS.

OWNER – Only the application owner can log on. All other users are prevented from logging on. If they are currently logged on, they are forced off the system until the option is reset to All_USERS or ADMINISTRATORS. Only the application owner can restrict other administrators from using the application.

  • /DEBUG=[true|false] – Specify whether to run the utility in debug mode. The default is false. (optional)
  • /HELP=Y – View the utility syntax online (optional)

Example

MaintenanceMode.cmd /A=app1,/U=admin,/P=password,/LL=ADMINISTRATORS

MaintenanceMode.cmd /A=app1,/U=admin,/P=password,/LL=ALL_USERS


BUG REPORT – Shared Members Security in EPMA

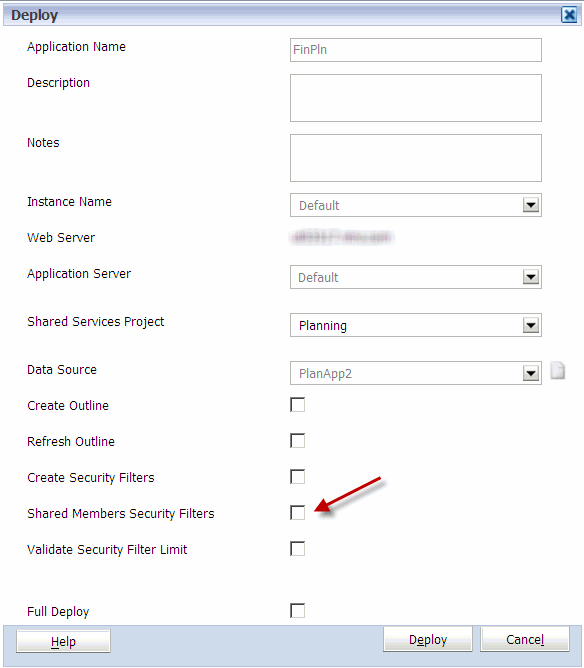
Oracle has confirmed a bug related to the deployment of security with a planning application maintained in EPMA in version 11.1.2.x.  When the Shared Members checkbox is selected in an EPMA deployment of a Planning application, it ignores this option.  Even if the Shared Members box is checked, the user still only gets access to Ohio Region, and not the children, in the example below.   Oracle is currently working on a patch.

What Does Checking Shared Members Do?

By default, any member that is a shared member under a parent with security, it gets excluded.  For example, if the security for Ohio Region is set to @IDESCENDANTS with READ access, the three members below Ohio Region would have no access.
– Ohio Region
– Columbus (Shared)
– Cincinnati (Shared)
– Cleveland (Shared)

The filter that gets pushed to Essbase would look something like this.

@REMOVE(@IDESCENDANTS(“Ohio Region”),@SHARE(@IDESCENDANTS(“Ohio Region”)))

When the shared members are checked, it tells Hyperion that you want to include shared members in the security.  The same example above, with shared members selected, would give users access to all 3 members.  The filter that gets pushed to Essbase would then look like this.

@IDESCENDANTS(“Ohio Region”)

The Workaround

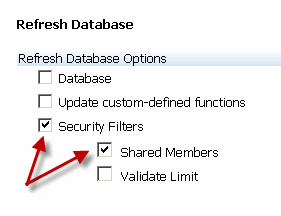
The workaround for this is to deploy the hierarchies from EPMA, and Refresh the database (security only) with Shared Members selected from Hyperion Planning.

When a patch is released, we will release the details.


Article Now Available in InVision

Josh Forrest and I presented at last year’s Collaborate conference.  Along with that presentation, we wrote a white paper on the implementation of Hyperion Planning.  This paper included process of selecting a vendor, the project goals, requirements gathering, project methodology, and even the lessons learned once the implementation was completed.

The editors of OAUG asked us if they could publish the article in the summer edition, which was released this week.  The article was written closely with Abercrombie & Fitch and represents the process from the business, not from the consulting services, point of view.

The article can be downloaded here at www.oaug.org.  Access to the article requires free registration.


Meet XWRITE, XREF’s New Big Brother

The introduction of Hyperion 11.1.2 has some fantastic improvements.  Many of these have been long awaited.  The next few articles on In2Hyperion will describe some of the enhancements to Hyperion Planning, Hyperion Essbase, and Hyperion SmartView.

XREF Background

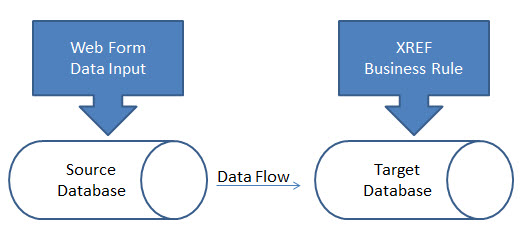
If you have been developing Planning applications, you are probably very familiar with the XREF function.  This function is used in business rules, calculation scripts, and member formulas.  It provides a method to move data from one plan type (Essbase database) to another plan type.  It is executed from the target database and pulls the data from the source.  XWRITE was actually introduced in later versions of 11.1.1.x, but is very stable in 11.1.2.x.  XWRITE is executed from the source and pushes data to the target.  This function is a huge improvement over XREF. 

XREF will copy data to a target database and must be executed from the target database.  The function pulls data rather than pushing it.  This causes two challenges.  Normally, the data is entered in the source database and is copied to the destination database.  When a Planning web form is saved, it can only execute a calculation on the database the web form is connected to (at least in older version – stay tuned).  This means an XREF function cannot be used when the form is saved.  The user has to go to another form, or execute a business rule manually, for the data to move.

The larger issue with XREF is accounting for block creation.  Remember, XREF pulls data from a source.  The destination may not have blocks that exist where the data will reside.  XREF does NOT account for the creation of the blocks if blocks don’t exist.  XREF must be used in conjunction with the CREATEBLOCKONEQUATION setting.  This is acceptable when fixing on very finite levels of data, but execution on larger amounts of data results in an extremely slow data movement process.  Essbase is responsible for the slow data movement process because it traverses all possible sparse member combinations to validate existence of data on the source.  Normally, data exists at a very small percentage of the possible blocks. In addition to the slow data movement process, it’s worth noting that the XREF function can also create blocks in your database which are unnecessary; ultimately increasing the size and decreasing the speed of your application.

Welcome to XWRITE

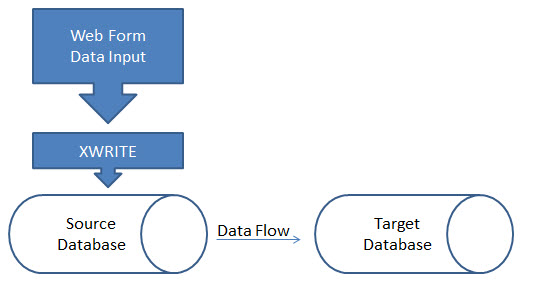
XWRITE is the opposite of XREF.  Rather than using XREF to pull the data from the target, XWRITE enables you to push data from the source.  Pushing data resolves the issues which XREF creates.

When XWRITE is executed from a web form, thus pushing data from the source to the target, there’s no longer a need to account for this process with two web forms or the manual execution of a business rule.

Since XWRITE is executed from the source, there’s no longer a need for looking at every possible sparse member combination on the target.  Using a FIX statement enables Essbase to decipher which blocks need to be copied, removing the guesswork and subsequently the requirement of CREATEBLOCKONEQUATION. Utilizating the XWRITE function results in faster processing and efficient block creation.

Prior to XWRITE, my preferred method of data movement involved exports from the source and imports to the target; thus eliminating the need for the XREF function.  The introduction of XWRITE has reduced the need for a data export/import process.


Follow @EPMTechTips And Stay In Touch With Hyperion Trends

I would like to introduce a networking opportunity for all you infrastructure groupies, or those interested in the technical side of the Hyperion suite.  Follow Rob Donahue on twitter – @EPMTechTips.

From Rob:

Get useful info as it relates EPM (Hyperion) technology, particularly around infrastructure, installation & troubleshooting. Questions are welcome!

Rob Donahue is the Director of EPM Infrastructure at Rolta and specializes in infrastructure and architecture with an emphasis on Oracle EPM systems. Rob has over sixteen years of experience delivering enterprise solutions utilizing his expertise in systems architecture, performance testing, and capacity planning. He has been applying this experience to leading the successful implementation of large and complex enterprise systems including Hyperion / Oracle EPM environments. These implementations have spanned across industries and have included Fortune 250 retailers and financial services companies.


Curse You Implied Share!

Although implied shares can improve performance by not storing the same data multiple times, it has many negative impacts. For example, implied shares cause problems in Hyperion Planning at the load level (level 0).  A parent with a storage property of Stored that has one child (or only one child that consolidates) will create an implied share.  This results in level 0 members being locked, preventing web form data entry.  In Essbase/Planning, the storage method of any parent with one child has to be changed to Never Share to allow user input.

For those of you who have been snake bitten by this, you will welcome a relatively unknown Essbase configuration setting in the Essbase configuration file (essbase.cfg). 

IMPLIED_SHARE [app_name] TRUE | FALSE

An admin can now change the default behavior of how single child parents react, regardless of whether the storage type is Never Share or Stored.  This can be done for all applications on a server, or select applications.

By passing a parameter of TRUE (the default value), the parent with one child, or has only one child that consolidates to the parent, is treated as an implied share.

By passing a parameter of FALSE, the default behavior of a parent with one child acts as if it was set to Never Share.

Take advantage of this Essbase configuration setting.  Remember, when you add it to the config file, make sure the Essbase service is restarted so it will take effect.