1

Get Groovy FREE for 12 months!

Oracle is providing free access to Oracle Financial Statement Planning, including Strategic Modeling, to all existing Oracle Planning Cloud customers for the next 12 months.  This includes the use of Groovy.

You would be able to purchase Financial Statement Planning and Scenario Modeling if you choose to continue using it. Alternatively, your right to use Financial Statement Planning and Scenario Modeling will expire after April 30th, 2021.

And yes, Hackett Consulting is a preferred provider to help you take advantage of this.

The Oracle FAQ will provide answers to your most of your questions.  If you would like to take advantage of this, let’s get the ball rolling!  If you are a do-it yourselfer, the following classes will kickstart your ability to implement Groovy.

Try it out for free getting a few samples.


Adventures in Groovy – Part 50: Incredibly Awesome New Methods

Oracle has recently added 2 fantastic new methods that significantly improve our ability to minimize our scripts and reduce the effort to build and maintain them.  The first is a method in the EPMScript class called cscParams.  The second is in the cube class named executeEssbaseScript.

cscParams

This method accepts almost any parameter, whether it be a member, string, list, array, or map, and converts every one of them to a delimited, quoted list of strings primarily used in FIX statements.

This is far and away better than fixValues, as that only accepted certain objects.  It doesn’t accept strings, lists, or maps.  It is also better than building string concatenations using escapes for quotes.

executeEssbaseScript

This method, in the cube class, gives us the ability to execute strings as calculations scripts.  Yes, we have had this before, but not in this capacity.  This has significant improvements over previous methods.

  1. This allows us to continue another process, unlike using return or just sending the last string as a calculation.
  2. This method returns the Essbase calculation error back to groovy so it can be used to dynamically account for errors.
  3. It also allows access to the @RETURN response, so that can be used to interact with calculations in a way we never had had before.

Examples And Use

Since I added these to the training offered at in2hyperion.podia.com, I thought it would benefit you all to have access.  I created a class that is free.  All you have to do is create an account and “purchase” a free class…for free!.  Each module is almost 10 minutes and goes through the use case.  I know many have concerns about investing in the classes, so this will provide a great sample of how the classes are constructed and facilitated.

That’s A Wrap

I am really happy/relieved/excited at the feedback I am getting.  Here are a few comments I have received.

  • Wow!  I can’t tell you how happy I am with the course you put together.

  • Module 10 is incredible.  This whole experience has changed my role in the organization.  I am the go-to person and asked to get involved in all of our projects.  The explanations are fantastic and delivered in a way that it just makes sense.  This is the best training I have ever taken.

  • I just finished your Groovy training. I happened to start it just ahead of needing it on a new project. I’ve now written a few Groovy rules to do things not otherwise possible and am loving it.

I know you might be concerned about the effort to create an account, but it will take just a minute or two, and it protects the content from being shared and copied on YouTube.  You will also be notified of any updates to the classes that you have access to.  The class can be purchased here.

COVID-19

We are living in unprecedented times.  Every few days I learn something new about how people are impacted.  People are spending thousands to create home offices.  People are isolated from the ones they love the most.  My college roommate passed away last week and I couldn’t be there, I couldn’t help his parents, and the funeral is for 10 people.  I know people have it way worse than me.  Our medical peers are in harm’s way.  But I hope positive things come out of all of this.  Working from home will be more acceptable.  People will appreciate things they took for granted before.  We will all become better cooks.  I think services are stretched and it will create opportunities for new and improved offerings.

The stress we are all under is starting to show though.  I see it in meetings.  I see it in my family.  I see it in social media posts.  People are moving less and we all know that exercise helps stress. I know my family’s sleep patterns are messed up.  Please be kind to each other.  Please let snippy comments go.  Please bite your tongue when somebody says something they shouldn’t.  And if you don’t, take a breath, walk away, come back and show some compassion.  None of us are perfect and this is causing enormous amounts of stress that honestly, I am just realizing.


Adventures in Groovy – Part 49: Unable To Retrieve Variable Deployed In Application

Have you ever gotten an error that reads, “Unable to retrieve variable variable name deployed in application?”  When you look at the error, the variable name in the error message doesn’t exist and you aren’t trying to retrieve such a variable?  If you spent enough time, or your script was small enough, you might have recognized that the variable name that it can’t find is a Groovy variable.

The Issue

The following script is an example, and likely a piece of a larger script.  All this does is create a string variable named uda and sets it equal to Locked.  It is then used in a metadata query that returns a list of the name of all the members with a UDA of Locked.

String uda = "Locked"
List<String> lockedAccts = operation.application.getDimension('Account',rule.cube).getMembersWithUda("${uda}",false,rule.cube)*.name

When this is executed, it returns an error that reads Unable to retrieve variable uda deployed in application.

Why is the script looking for a substitution variable of uda?  You might be thinking, I know I have put Groovy variables in strings and this hasn’t happened, so what the heck?  Can I now use Groovy variables?

Struggling through this, once again the Oracle development team, and you know who you are, helped me figure this out.  And, here is the reason this is happening, how to fix it, or use it to your advantage.

The Why

This is actually a bug of sorts. As Oracle has added functionality, this cropped up as an unintended issue.  Originally, anything in squiggly brackets is interpreted as a variable, like in an Essbase calculation.  This was built to interpret this.  When Groovy was added, and using the same syntax to reference Groovy variables, not substitution variables, the interpreter of the Groovy script kind of tripped over itself.  The way it is built is to look at these in the native Essbase variable ONLY IF there are no run time prompts identified.  If there are RTPs in the script, the interpreter changes and interprets them as Groovy variables.  Since so many clients use this for the unintended purpose of identifying substitution variables, Oracle can’t “fix” it as it would completely hose a lot of people.

The Fix

The fix is simple, add run time prompts!  Seriously, I have to add an RTP even though I don’t need one?  No, all you have to do is enter /*RTPS:*/ ANYWHERE in the script. I normally add it to the top and the script above would now look like this.  When I add the RTP indicator, even with no run time prompts, the interpreter doesn’t look for anything in squiggly brackets to variables, but the more likely expectation, a Groovy variable.

/*RTPS:*/
String uda = "Locked"
List<String> lockedAccts = operation.application.getDimension('Account',rule.cube).getMembersWithUda("${uda}",false,rule.cube)*.name

When I run this script, I get a successful message.

That’s a Wrap

This post was a long time coming. I had somebody ask me about it and it made me realize that I haven’t shared this information.  I make it a practice to always add /*RTPS:*/ to every Groovy script.  If you want to get more information like this, become an industry leader, check out Groovy For Planning.


Adventures in Groovy – Part 47: Real World Wins, Part 1

A specialty chemical products company created an ASO reporting cube in ePBCS.  This application housed detailed data that rolled up to a GL account.  The problem was the source didn’t always tie to the GL due to restatements, GL entries, and manual corrections.  Since they wanted the data to match to the book of record, but still have the level of reporting  at the detailed level, they wanted to load data from both systems, calculate the variance, and store that variance so users would see the difference between the two sources.

There were a number of challenges.  Procedural calculations were “too complex” and could not calculate at all the levels.  They didn’t want to engineer a new solution that included a BSO calculation where the data was replicated and calculated.  So, Groovy was selected to calculate the variance.

Dimension Explanation

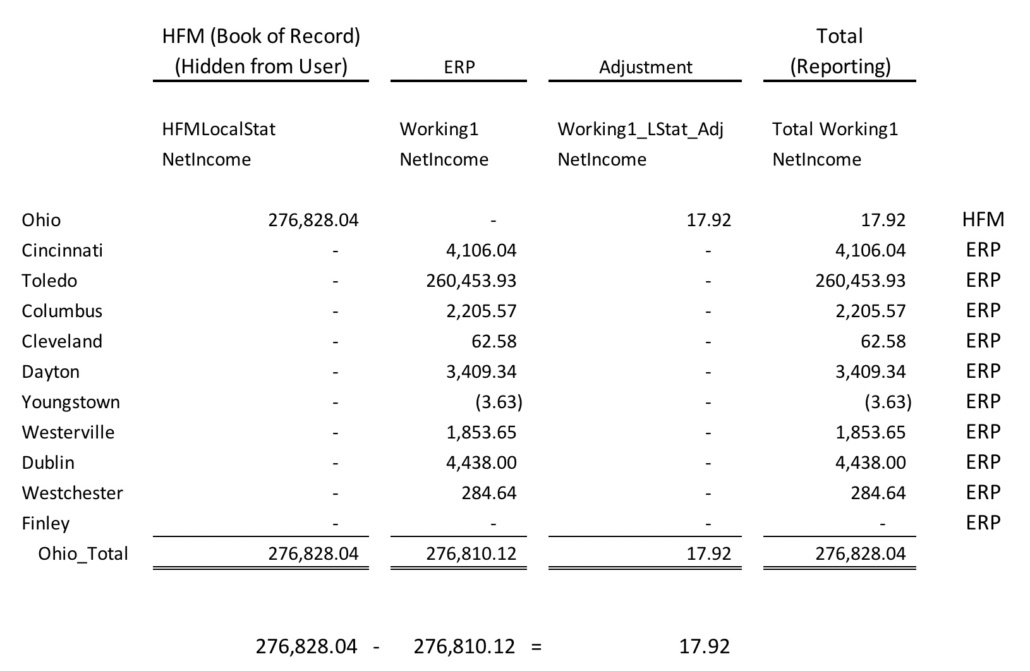
To simplify the explanation, this following Smart View retrieve will help tell the story.

Organization dimension includes sub organizations from the ERP, as well as the official organization in HFM.  If Ohio was an organization in HFM, the hierarchy would look similar to this.

  • Ohio_Total
    • Ohio
    • Cincinnati
    • Columbus
    • Cleveland

I would have preferred to use a source dimension for this, but the application didn’t include one.  So, we used version, and it look like this.

  • Total Working
    • Working (where the actuals were loaded) – named working1 in the script below
    • Working Adjustment (where the adjustment to get back to the book of record was stored) – named Working1_LStat_Adj in the script below
  • System Versions (hidden from users)
    • HFM Stat (where HFM was loaded) – named HFMLocalStat in the script below

Groovy Calculation Overview

The calculation prompted the user for a start and end month, and the year. The follow was done at the bottom of every other dimension in the application.

  1. The first piece of the calculation queried the Org hierarchy and found all the level 1 members that ended in _Total (Ohio_Total in the example above).  These were stored in an array to be used later.
  2. The second step was to retrieve the data from HFM (HFMLocalStat) and the data loaded from the ERP (Working1) at level 1.
  3. The third step was to calculate the variance between x_Total member for the ERP and HFM data and store it at the HFM child member in Working1_LStat_Adj.
  4. The last step was to submit the results

The application didn’t have a source dimension, which is normally where I would account for this, so we added a few additional versions.  The first was a statistical version that was only used to house the data imported.  Users didn’t have access to this version.  The GL data was loaded to a statistical version.  The working version was compared to the statistical version, and the difference was stored in working adjustments.  The two of these combined was used to report from

Groovy Calculation Deep Dive

The calculation would skip the months that had no data.  For 12 months, the calculation finished in less than 5 minutes.  The calculation was designed, built, system tested, and went through user validation in a few days.  The total development time was less than a day.  The administrators could use the existing architecture with no changes required (outside of creating a new member in the xxx dimension)

[membership level=”0″]


In2Hyperion has premium content that is only available to those who make a small annual donation.

Already have an account with
in2Hyperion?

Login

Want to purchase a subscription to
the premium content?

Purchase Today


[/membership]
[membership]

/*RTPS: {rtpMonth} {rtpYear} */
def rtpMonth = rtps.rtpMonth.getEnteredValue()
def rtpYear = rtps.rtpYear.getEssbaseValue().replaceAll('"', '')

def lastMonth = Calendar.instance.with {
time = new Date().parse("MMM", rtps.rtpMonth.getEnteredValue() )
it[ MONTH ]
}

// Setup connections
Cube cube = operation.application.getCube("Operations")

// Identify the orgs that are taken into account and need adjusted
// members with a parent equal to the child with a _Total suffix
Dimension orgDim = operation.application.getDimension("Org", cube)
def keyProp = "Parent"
def orgParentChild = [:]
def Orgs = orgDim.getEvaluatedMembers("ILvl0Descendants(All Org)", cube) as String[]
Orgs.each{
  Member orgMbr = orgDim.getMember(it)
  def memberProps = orgMbr.toMap()
  if(memberProps[keyProp] == it.toString() + "_Total"){
    orgParentChild[it] = it.toString() + "_Total"
  }
}
def orgParents = orgParentChild.collect{it.value}

// Loop through months selected
(0..lastMonth).each{ iMonth ->
  def runMonth = new java.text.DateFormatSymbols().months[iMonth]
  def runDay = "${iMonth+1}-1"
  println "Executing for ${runMonth}"

  // retrieve the ERP and HFM data points
  DataGridDefinitionBuilder EntityBuilder = cube.dataGridDefinitionBuilder()
  EntityBuilder.addPov(['Market','Project','Scenario','View','Years','Currency','Product','BT_Customer','Customer'],
                       [['Total_Market'],['Total Project'],['Actual'],['PTD'],[rtpYear],['USD'],['Total Product'],['BT_Customer'],['TotalCustomer']])
  EntityBuilder.addColumn(['Period','Version'], [[runMonth] , ['Working1','HFMLocalStat','Working1_LStat_Adj']]) 
  EntityBuilder.addRow(['Entity','Org','Account'], [ ['ILvl0Descendants("Total Entity")'],orgParents,['ILvl0Descendants("NetIncome")'] ]) 
  EntityBuilder.setSuppressMissingBlocks(true)
  DataGridDefinition EntityDefinition = EntityBuilder.build()

  // Calculate and submit the adjustments
  // Build the grid based on the rows in the previous grid
  cube.loadGrid(EntityDefinition, false).withCloseable { entityGrid ->
    if(entityGrid.size() > 0){
      DataGridBuilder builderSubmit = cube.dataGridBuilder("MM/DD/YYYY")
      builderSubmit.addPov('No Market','No Project','Actual','PTD',rtpYear,'USD','No Product','BT_No Customer','No Customer','Working1_LStat_Adj')
      builderSubmit.addColumn(runDay)
      entityGrid.dataCellIterator("Working1").each{ it -> 
        builderSubmit.addRow([it.getMemberName("Entity"), it.getMemberName("Org").toString().reverse().drop(6).reverse(), it.getMemberName("Account")], [it.crossDimCell("HFMLocalStat").data - it.data])// it.crossDimCell("HFMLocalStat").data
      }
      DataGridBuilder.Status status = new DataGridBuilder.Status()
      DataGrid gridx = builderSubmit.build(status)
      cube.saveGrid(gridx)
      println(" Total number of cells accepted: " + status.numAcceptedCells)
      if(status.cellsRejected.size() != 0){
        println(" Total number of cells rejected: " + status.numRejectedCells)
        println(" First 100 rejected cells: " + status.cellsRejected)
      }
      gridx.close()
    }
    else{
      println "No data available."
    }
  }
}
println "Finished"
return

[/membership]

That’s A Wrap

This is a great example of how we can inject new and creative ways to solve problems with speed in processing, speed in developing, and introducing no additional maintenance.  Look for more of these real world wins in the future.


Adventures in Groovy – Part 46: Start Making Rules More Reusable, Part 1

One thing that I have spent a lot of time on is making calculations independent of forms so that they can be used on any form.  For example, rather than hard coding a script to look at a form with one column header and one row header, I am now building things to be dynamic so that the POV, the rows, and columns all are read dynamically and identifying the edited cells is independent of the source it is looking at.  This will be a multi-post article because there is a lot to cover.

Think Different

I have not talked about some of the, what might seem like, less functional classes and methods in the API.  Most of my examples don’t go into their use.  The reason is solely trying to break concepts apart and try to not overload people with everything at once.  What if I told you you could eliminate most of your substitution variables?  What if I said you only need one data map?  What if I told you that you could use rule properties like never before?  Spoiler alert, you can!

Building The Foundation

The first concept I want to share is a simple one, but it is the start of making your scripts dynamic.  When working with grid builders, a reference has to be made to the plan type.  This is a very simple thing but has to be changed for different plan types.  You might first think to put this in a script and embed the script, but there is an easier way that makes it completely independent of the plan type or application.

Everything I have shown you with grid builders starts with this.  This means that every rule has to have a hard-coded plan type in it.

Cube cube = operation.application.getCube("plantypename")

Well, this isn’t the case.  It can be done without hard coding the play type name.   The cube variable can be set by getting the cube that the rule is created in so the rule will work on any plan type in any application.

Cube cube = rule.getCube()

I can take that one step further and eliminate the cube variable all together.

DataGridBuilder builderSubmit = rule.getCube().dataGridBuilder("MM/DD/YYYY")
//or
DataGridBuilder builderSubmit = rule.cube.dataGridBuilder("MM/DD/YYYY")

Grid builders aren’t the only class that uses this.  If you are doing anything with metadata, this will also benefit those scripts.

Dimension productDim = operation.application.getDimension("Period", cube)
// can be changed to
Dimension productDim = operation.application.getDimension("Period", rule.cube)

That’s A Wrap

We have access to all kinds of things that we can make use of now through these classes. The application class exposes the currency mode and the default currency.  We have access to the smart lists and can access those.  Could we use those in calculations?  Maybe it is used as a map, where label and description is an account conversion between plan types?  We can get the dimensions, so a calculation could see if a dimension exists.  Maybe we can dynamically create fix statements based on the dimensions in the cube (aggregate everything that is sparse).  User variables can be set, so maybe if a calculation runs and the user variables aren’t set, we ask the user to set it with an RTP, then continue the calculation?

The rule class has methods to get the description, the name, and the rule properties.  I can’t say I have done it, but maybe we used the description as a variable?  Maybe we have the name in a convention that specific characters mean something and are brought into the rule, like a the scenario name?

Some of these are just thoughts, and some of them are things that we could implement and use.  My point is that there are all kinds of things we have access to dynamically that we didn’t before.  The apps I am building don’t have variables for the open periods anymore because I can get them dynamically in the calculation based on the scenario being calculated.  No more start and end month.  No more current month.  And, if they are needed for reports or forms, have the calculation set them if they are wrong.

So, what are you thinking?  Do you have something you have done that you couldn’t do before Groovy?  Share it by commenting.


Adventures in Groovy – Part 45: Locking Cells On Load

Often times, there is a need to lock cells from a user outside of the traditional dimensional security methods.  Maybe you don’t want to add dimensional security to accounts so your data push allows users to push data to another cube.  Or, maybe there is more complicated logic to identify who can and who can’t edit a cell.  The logic to do with is very simple.

Locking Cells

If you have read many of my articles, you likely have read about how to iterate though cells with the data grid iterator.  If you haven’t, starting with Part 3 would be a good start.  The grid iterator allows the script to loop through all cells, edited cells, or a filtered list of cells.  This is traditionally used to execute logic after a user edits a form, but it can be used to lock cells when the form is loaded.  Whether it is simply specific accounts, products, or a more complicated filter like products that have or don’t have a specific attribute, it quite easy to do.

Following are two ways to lock the cells.  The first is more dynamic.  This could do all kinds of things, like lock the cell if it was above a specific value, or if it had a specific attribute, or even something silly, like if it the user’s name was Kyle!

// identify the rows to be locked in a list collection
List<String> lockCells = ['Net Income']
// lock the cells
operation.grid.dataCellIterator().each {
     // Lock the cells if the measure member of the cell is in the lockCells list
     if(lockCells.contains(it.getMemberName("Measures"))){
          it.setForceReadOnly(true)
     }
}

The next example would do the same thing as above, but would filter the cells the iterator loops on and lock all the cells that meet the filter applied.

// identify the rows to be locked in a list collection 
List<String> lockCells = ['Net Income']
// lock the cells
operation.grid.dataCellIterator(lockCells.join(',')).each {
     it.setForceReadOnly(true)
}

Add To The Form

Now that the rule is built, the only thing left is to add this to the form in which it should run.  The key is to add this rule and check the Run After Load checkbox.  This will allow the form to load (or render), and then run the rule, which in this case, will change predefined cell properties so that it is not editable.

That’s A Wrap

This is not the longest post I have ever made, but it doesn’t mean it is less useful.  Locking cells based on criteria, criterial we never had access to before, is quite interesting.  When security is set to lock a cell from a user through dimensional security, it also means the users can’t use data pushes to move that calculated data to other cubes, which is an issue.  Think about adding an attribute or UDA to those accounts and then building a common script that runs on all forms that locks the cells with that attribute or UDA.  It wouldn’t be any more difficult to build, and it can be automated through metadata builds.  Hmmm, wouldn’t that be nice!


Adventures in Groovy – Part 44: Don’t Waste User Time and System Resources

Data forms that have rules on them run when a user saves a form, regardless of whether the form has edited data.  Sometimes this is by design, to let a user run a calculation.  But, most of the time, it is an accident.  There is no reason to use system resources and have the user wait for a calculation to finish when it doesn’t need to be executed.

Check If Data Has Changed

There is a very simple way to check if a data form submitted has data that has been edited, or changed.  Several previous posts have talked about the data iterator.  The data iterator is used to loop through the cells in a form.  Predicates can be used to only loop through the cells that have been edited.  The documented example shows the code to identify and loop through the edited cells, printing each to the job console.

operation.grid.dataCellIterator({DataCell cell -> cell.edited}).each {
     println("$it.memberNames, cell data: $it.data")
 }

If you are starting to understand the methods and collections, you notice that this returns a list of data cell types.  From this, I can get all the properties of each cell.  Since this returns a list, I can also use the size method.  The size method returns the number of elements.

operation.grid.dataCellIterator({DataCell cell -> cell.edited}).size()

This will return the number of edited cells.  It isn’t a stretch to take this one step further and wrap it in an if statement to see if the number of edited cells is more than 0.  If it is 0, then no cells have been edited.

IF(operation.grid.dataCellIterator({DataCell cell -> cell.edited}).size() == 0){
   ...take action
}

Inform The User Or Not

This is where there is some administrator preference.  I can argue both ways, but I think it depends on the users and the expectations of what happens when a form is saved.  One one hand, I can argue that the rule should exit without notifying the user that nothing ran.  It is an extra click that they have to respond to that might be annoying.  Telling them that nothing changed, and no calculation ran may not be needed.  In this case, the calculation exits gracefully, and everybody moves on.  Using return exits the calculation.

IF(operation.grid.dataCellIterator({DataCell cell -> cell.edited}).size() == 0){
    return
}

On the other hand, the user be expecting something to happen.  They might need to know that they didn’t edit anything.  If this is the situation, I can throw an exception and prompt the user there was an issue.  Using throwVetoOperation will do just that.  It initiates an error and nothing further runs.

IF(operation.grid.dataCellIterator({DataCell cell -> cell.edited}).size() == 0){
     throwVetoException{"No data was edited and no business logic was executed."}
}

The throwVetoException method can also use the Groovy message bundle and bundle loader if you are using those classes.

That’s A Wrap

I have used both methods, exiting without notifying the user and existing and notifying the user.  My preference is to simply exit and not run or notify the user because normally they don’t need to know nothing ran because nothing changed.  Regardless, I think it is a good practice to add this to your Groovy calculations to account for a user saving a data form when no data was edited.


Adventures in Groovy – Part 43: Sending Proactive Emails In A Calculation

If you haven’t heard, we now have the ability to execute REST API within a calculation script.  Not only does that mean we can interact with other environments and do things in calculations we couldn’t do before, we also have the ability to interact with any provider that has REST.  You could pull current prices for products from Amazon.  You could see how many open box items there are at area Best Buy stores.  You could pull in currency rates.  That doesn’t even touch on the things like DM processes, metadata updates, and application refreshes. You can even send emails!

First, what is REST API?

A RESTful API is an application program interface (API) that uses HTTP requests to GET, PUT, POST and DELETE data.  A RESTful API — also referred to as a RESTful web service — is based on representational state transfer (REST) technology, an architectural style and approach to communications often used in web services development.

What this means is you can interact with services through web URLs.  When you send an email or purchase a product, you are using HTML Post and Get requests.

How does it work?

REST is basically a way to post (do something) and get(receive something) through website URL calls.  There is more to it than that, but that is the basic concept.  There are all kinds of services, free and paid, that provide services through REST API.

Since I am all about automation and communication, one thing I thought would be great is if a user runs a calculation and it fails, to proactively notify an admin.  Prior to this month, you would have to write something outside of the UI for Planning to do this.  This would be reactive.  Wouldn’t it be better to get an email or text immediately so you can act quickly and diagnose the problem?  Heck yeah it would.

The REST API Provider

There are a number of providers that give you the ability to send emails via REST API.  A few are free for a limited number of emails per day/month.  Mailjet is one of them.  I went out and signed up for a free account.  It allows you to send up to 6k emails a month, with a maximum of 200 per day.  That is cool for my purposes of demoing functionality.

There are a few things you need.  First is an encrypted key and private key.  That you will get when you create our account.  Next, the documentation lays out what needs included in a post (do something) to send an email.

To send an email through mailjet, you post to a url of https://api.mailjet.com/v3/send and pass a body that has the typical information to send an email, like from, to, and subject.  The body is formatted as a json object.  Json is not super complicated, as it is basically the same as a Groovy map, or an xml format.  To focus on the API, I will explain json at a later time.

Send An Email

The first thing that needs built is a connection to the REST API provider.  You can create a connection to be reused in Planning (epbcs), but for this example, I am just going to keep it simple and use a connection object with the appropriate parameters.  To keep my account private, I remove my keys and replaced them with PublicKey and PrivateKey.  Just remember these both need replaced with the actual keys.  The status should return 200 if the request is successful.

Connection connection = connection("https://api.mailjet.com","PuclicKey","PrivateKey")
println  connection.get().asString().status

Next, I am going to walk through the body that needs passed.  Again, this is basic info that is not surprising.  Each element has a property and value.  To avoid any more spam in my email account, I replaced the from and to email with invalid emails.  These should be changes to include valid from and to emails.

def bodyMap = new JSONObject()
bodyMap.put("FromEmail","xxx@in2hyperion.com")
bodyMap.put("FromName","Kyle Goodfriend")
bodyMap.put("Subject","My first email from a Groovy Calculation!")
bodyMap.put("Text-part","This is an email from a calculation")
bodyMap.put("Html-part","<h3>Dear Admin,</H3><br />This is an email from a calculation")
bodyMap.put("To","xxx@in2hyperion.com")

Next is the actual request to post (or do something).  The path to send emails in the URL is https://api.mailjet.com/v3/send.  The only thing we need to add to the post here is the path since the URL is in our connection.  The post requires two parameters.  First, the request requires one header identifying the content as json.  The second parameter is the body that includes the email information, which we have in the bodyMap, which we simply convert to a string.

HttpResponse response = connection.post("/v3/send")
.header("content-type","application/json")
.body(bodyMap.toString()).asString()
println response.status
println response.body
println response.statusText

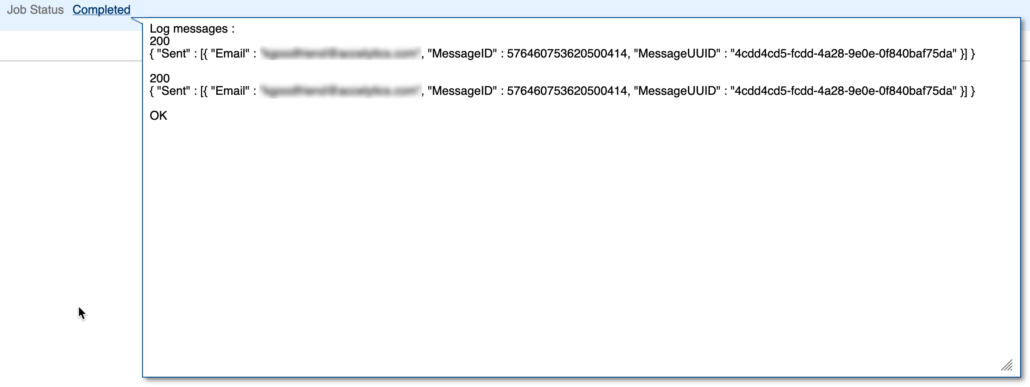
This all said, the result is an email to your inbox and a log in the job console that looks like this.

Last Call

Well boys and girls, that is all she wrote.  That is it.  If your calc throws an error, use try/catch/finally and send the appropriate people an email.  If the calc is a long running calc, user operation.user to send the person that executed it an email when it finishes.  The possibilities are endless but you now have a mechanism to have proactive communication, not reactive and time-consuming effort.

One note about mailjet.  I have no affiliation to this service.  I have not used it other than to demonstrate this functionality.  A FREE account does allow you to send 6k emails a month with 200 at most every day.  If you want to use this in a production situation, you likely will need to pay for basic account, which is less than 9 bucks a month.


PBCS/EPBCS Data Import Options

Importing data directly into PBCS can be done in two ways.  There is a planning format and an Essbase format.  Yes, it can be loaded through Data Management, but this is focused on explaining the direct import process, the formats, and the benefits to each.

Planning File Format

What Is The Planning File Format

Per Oracle, if data is exported to a file in the Planning format, you can use Notepad to change the database name in the file; for example, ASOCube, and then import the data file into the aggregate storage outline provided all dimensions exist.

This is fine and dandy if you are importing data exported from Planning.  Normally, there is a source that is giving the data to PBCS and a format has to be provided to that source.  The format is basically a delimited file with some quotes around a group of the fields.  Technically, there are 3 pieces of the file.

  1. One dimension has to be in the rows.
  2. One dimension has to be in the columns.
  3. The third section is the POV, or the remaining dimensions.

It looks like this.

Account,Jan,Feb,Mar,"POV",Plan Type Name
10020,40.10,50.60, 70.20,"Actual,Final,Company_10,FY18",Finance

Why Use The Planning Format?

There are some benefits and drawbacks of using this format.

  • Data loaded to smart list accounts can be loaded as the actual smart list label. This is great for applications where the data is provided in that format.  WFP data often provides data in the smart list value, like Part Time/Full Time.
  • When there are errors, the load continues through the end of the file.
  • The job console shows the number of records processed, the number of records that couldn’t be loaded, and the first x lines of errors with line numbers.  I will warn you that I have seen the console show all records loaded and nothing loaded.  I have also seen no rejected records when the file didn’t load completely.  So, when you are developing loads, I would recommend validating carefully and looking at the block counts to ensure the messaging in the console is correct.
  • The biggest drawback to loading the planning format is that it loads through Planning and because of some of the benefits, it is slower to load. This normally isn’t a huge issue because the loads are finished within a few minutes.
  • The format is a little odd and can sometimes be problematic to produce.  Certain dimensions are required in the row and column headers.  This is often challenging.  For instance, most applications require the months to be in the row or column areas.  Since they can’t be put in the POV, more than two months have to have multiple columns.  If the source can’t produce this easily, a file for each month has to be created.

Essbase File Format

Why Use The Essbase Format?

Loading directly to Essbase is faster and often times easier to produce the needed format.  It loads directly to Essbase so none of the mapping done when loaded through Planning (like smart lists) happens.  This is often a huge headache because the mapping has to be done in the source or in some middle ETL layer (assuming DM is not being used).  Another issue with using this method is that when a record rejects, nothing more is loaded.  The job console also does not show the records processed.

What Is The Essbase File Format

Per Oracle, (exported by an on-premises product). These files can be formatted in either Cell list or Column list format. Cell list format specifies a single cell value for each record, whereas Column list format specifies multiple cell values for each record. For example, if you specify Time on the column, you might have the values Jan, Feb, Mar, and so forth on the column, with 12 values for each record (that is, one for each month). Conversely, the Cell list equivalent would contain 12 records, one for each month. For information on exporting files from Essbase, see the on-premises Oracle Essbase Administration Services Online Help.

That doesn’t tell us much.  The format of this loading methodology is almost identical with the Planning format.  The thought process is a little different.  This file will hold a column for every dimension but has no header line.  Each dimension is preceded and terminated by quotes and delimited by a tab.  All the dimensions are listed first, followed by the value of that intersection.  The planning format shown above will look like this

"10020"       "Actual"      "Final"       "Company_10" "FY18" "Jan"  40.10
"10020"       "Actual"      "Final"       "Company_10" "FY18" "Feb"  50.60
"10020"       "Actual"      "Final"       "Company_10" "FY18" "Mar"  70.20

Last Call

Neither of these formats/methods are complicated, but the documentation is lacking when explaining exactly what they are.  There is little mention to the pros/cons.  Hopefully sharing this will fill in the gaps that exist in the documentation.


Adventures in Groovy – Part 42: Using Scenario Start and End Periods Through Metadata Queries Provides Awesome Functionality

Identifying the months to calculate plan and forecast has always been a delicate balance between performance and maintenance.  Having a calculation for each required duplication of forms or calculating more than what was required.  Calculations required more complicated if logic than what it should have or (I hate when I see this) a calculation that just does both forecast and plan regardless of what needs calculated.

Groovy has opened up a lot of options.  We can identify if plan or forecast is in the form and dynamically build the Essbase calculation, which is what I have started doing.  This, combined with only calculating on the edited cells, gets you part of the way there.  It doesn’t help with global calculations or calculations when a single month will impact all months, like when there are balance walk forwards.

Groovy provides us the ability to get member properties, which I have discussed before.  The Scenario dimension has unique properties, like the start month, start year, end month, and end year, which is what creates the security on the periods and years for each scenario.  Once these are identified, the possibilities are endless.  They can be used to create gridbuilders, they can be used to dynamically fix on the correct periods in Essbase calculations, or they can be used to do other date specific things.

Groovy Calculation and API

At this point, you are probably very well aware of the operation class, which has an application sub class.  The application subclass has many functions within it that are useful.  One, is the ability to create a dimension object.  From there, a member object can be created.  The following is a very simple example to hold a scenario member in a member object that can be used in many ways.

Member mbrScenario = operation.application.getDimension('Scenario').getMember('Plan')

If the scenario is a run time prompt, it would look like this.  Assume the RTP is named rtpScenario.

Member mbrScenario = rtps.rtpScenario.getMember()

When the member object is initiated, all the properties of the specific member are available.  You may want to review Adventures In Groovy – Part 11: Accessing Metadata Properties before continuing.  The same concept is used here, but the properties returned are slightly different.  The four we want to access are

  • Start Period
  • End Period
  • Start Year
  • End Year

These can be stored in variables or used within calculations or other logic.  There may be a need to convert the month member to a long month or a number.  The year may also be converted to remove the FY and prepend 20 so it can be used in date manipulation.  println mbrScenario.toMap() produces the following, so the full list of properties is a little different than what was produced in Part 11.

Log messages : 
{Parent=Scenario, Two Pass Calculation=false, Process Management Enabled=true, Old Name=Plan, Formula=<none>, End Year=FY20, UDA=, Aggregation (GTech)=+, Solve Order (GTech)=0, Essbase Name=Plan, UUID=91f18d30-fc37-4e0b-bc9a-99668194e793, Member=Plan, Data Storage=never share, Hierarchy Type=none, Allow Upper Level Entity Input=false, End Period=Dec, Start Period=Jul, Aggregation (ProdRev)=+, Include BegBal=true, Data Storage (GTech)=never share, Formula Description=<none>, Data Id=2573227211374885, Data Storage (ProdRev)=never share, Start Year=FY18, Data Type=unspecified, Formula (GTech)=<none>, Old Unique Name=<none>, Formula (ProdRev)=<none>}

Since this is a Groovy map, a type of Groovy collection, any of the elements can be accessed by referencing the element key.

println mbrScenario.toMap()["Start Year"].toString()

Multi Year Example

Since many applications will span over multiple years, there is some additional logic that has to be built to loop through the months.  If the user is prompted for a start period/year and end period/year, you may need to validate that the date range is within the start/stop periods on the scenario, which also is easier to evaluate if these are converted to dates.

[membership level=”0″]


In2Hyperion has premium content that is only available to those who make a small annual donation.

 Already have an account with
in2Hyperion?

Login

 Want to purchase a subscription to
the premium content?

Purchase Today


[/membership]
[membership]

Building The Date Range

Creating a map with the year and the list of months is a great way to store the date range.  It can be used to build lists for gridbuilders that read data (parameters are multiple rows/columns by year with periods as a list object), creating Essbase calculations by year, and headers for grids that are submitting data (which are string arrays).

Expanding on what was previously discussed, this will convert the year to a valid year by removing FY and create a date object that stores the start and end dates in variables.  Notice the start date uses a day of 1 and the end date uses a day of 2.  This is important later on.

Member mbrScenario = operation.application.getDimension('Scenario').getMember('Plan')
Date scenarioStart = Date.parse("yyyy-MMM-dd", "20${mbrScenario.toMap()["Start Year"].toString().substring(2)}-${mbrScenario.toMap()["Start Period"].toString()}-01")
Date scenarioEnd = Date.parse("yyyy-MMM-dd", "20${mbrScenario.toMap()["End Year"].toString().substring(2)}-${mbrScenario.toMap()["End Period"].toString()}-02")

Now that we have two dates, the next step is to create the map to hold the results.  This map will look like similar to this for a date range when Jul,19 through Dec, 20 is selected.

['FY19',['Jul','Aug','Sep','Oct','Nov','Dec'] , ['FY20',['Jan','Feb','Mar','Apr','May','Jun','Jul','Aug','Sep','Oct','Nov','Dec']

This is created by looping through the two dates by month.  This example uses a while loop and will iterate through each month WHILE the iteration date (current) is before the end date.  If the scenarioStart and scenarioEnd dates had the say day, this would exclude the last month because they would be the same.  This also uses the calendar class to increase the date by month, which isn’t available in the date class.

// Create the variables needed
// PeriodRangeMap holds the years/months
// calendar and current are used in the iteration process
Map<String, List<String>> periodRangeMap = [:]
Calendar calendar = Calendar.getInstance()
Date current = scenarioStart

while (current.before(scenarioEnd)) {
  // Set the calendar variable to the date of the current variable 
  calendar.setTime(current)
  // If this is a new month, create a null map element to hold the new year and months
  if(periodRangeMap["FY${current.format("YY")}".toString()] == null){
    periodRangeMap["FY${current.format("YY")}".toString()] = []
  }
  // Append the month to the appropriate year
  periodRangeMap["FY${current.format("YY")}".toString()] << current.format("MMM").toString()

  // Increase the calendar variable by one month
  calendar.add(Calendar.MONTH, 1);
  // set the current variable to the next month's date
  current = calendar.getTime();
}

If we print the periodRangeMap to the job console using a println, assuming the start month is Jul of 18 and the end month is Dec of 20, this will be displayed with the exception that line returns are added to make it readable.

Log messages : 
{
FY18=[Jul, Aug, Sep, Oct, Nov, Dec], 
FY19=[Jan, Feb, Mar, Apr, May, Jun, Jul, Aug, Sep, Oct, Nov, Dec], 
FY20=[Jan, Feb, Mar, Apr, May, Jun, Jul, Aug, Sep, Oct, Nov, Dec]
}

The periodRangeMap can then be used to loop through and create the lists and maps used in gridbuilders and datamaps.

[/membership]

Last Call

The ability to directly access the start and stop period/year really gives partners a new thought process to implementation options where these periods are critical.  It is very easy to access, very easy to implement, and extremely useful.  If you have an idea of how to use these dates, share them with the community so we can all benefit.  Hope to see an idea soon!